


Writing and bypassing a kernel-side EDR - Part 1: Kernel & Drivers
In this series of articles we’re going to switch topics a bit (from Active Directory) to take a look at EDRs. More specifically, we’ll look at how EDRs work on the kernel side. Before getting into the heart of the matter, a few notions about Windows architecture will be recalled before discussing how an EDR works on the user side (User-Land), then descending into the kernel (Kernel-Land). We’ll then explain how these two worlds communicate, and then we’ll detail the structures manipulated on the kernel side in order to explain how a driver works. All these elements will then allow us to write our first driver, before enriching it and turning it into an EDR with which we can communicate from User-Land. We’ll finish by writing another driver whose purpose will be to bypass the protections we have set up.
Quite a program, isn’t it? Buckle up, and let’s go.
Preamble
As I finally dove into this research, I came across the book Windows Kernel Programming by Pavel Yosifovich. This book is a real gold mine, and most of what I’ve understood (or what I think I’ve understood) comes from this book. This series of articles will therefore be largely based on the knowledge I’ve acquired by reading this book. I therefore warmly thank the author, Pavel Yosifovich, for this content of very high quality.
I would also like to mention these very interesting resources that allowed me to get a glimpse of how drivers work. The excellent article Windows Kernel Ps Callbacks Experiments, the article Pimp my PID - get SYSTEM using Windows kernel by Viking, or Kernel Karnage – Part 1. Each of these articles brought me its share of knowledge and understanding.
That said, and this is somewhat the reason for being of my blog, I also want to take on the exercise to put some order in all this mess that’s bustling around in my head.
Objectives
This series of articles will have several objectives. The methodology to achieve them will be to zoom in more and more on the parts of an operating system that interest us for the two final goals, namely writing a micro-EDR that will run at the kernel level, and writing a driver whose purpose will be to bypass this EDR.
User and kernel spaces
To achieve these objectives, we’ll go through several steps. We’ll start with a very high-level view of how an operating system works. This step can apply to both Linux and Windows, and will allow us to have the global picture. We’ll try to understand the notions of user space, kernel space (User-Land and Kernel-Land), and the interactions between these two spaces.
Processes
First of all, let’s address the notion of a process. A process is somewhat the envelope of a program that is being executed. As soon as a program is launched, a process is created, and is specific to the instance of the launched program. Within a process, you’ll find one or more threads, which are the elements that will actually execute the code. There’s also a virtual address space that represents the computer’s physical memory (RAM). So if a machine has 16GB of RAM, each process will contain 16GB of so-called virtual RAM. From the process’s point of view, there are indeed 16GB of accessible RAM. Within a process, we can also find a token, which is an object representing the security context in which the process is (who launched the process, the rights and privileges of this process, etc.), and of course the program that is being executed.

Virtual memory
We’ve already talked about virtual memory in a previous article, so we won’t detail the abstraction layer between virtual memory and physical memory. Let’s recall however that although all processes share the same physical memory, they only have access to their own virtual memory. From each process’s point of view, all of the memory is dedicated to it, and the other processes don’t exist. For this to work, a page table is located between each process’s virtual memory and physical memory. It’s thanks to it that each process thinks it has access to all of physical memory.
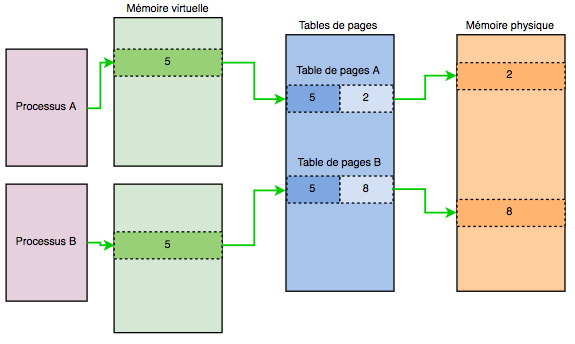
Except that to function properly, processes have various needs such as access to physical hardware (keyboard, mouse, graphics card), access to files, and these processes especially need a conductor to decide which thread has the right to execute instructions at what time.
Well, the code that governs all that is in a special space, the kernel. It’s the layer that handles all these low-level needs, and that is common to all processes. Indeed, whether it’s notepad.exe or sublime.exe that’s trying to access a file in read and write mode, the corresponding code will remain the same. The kernel is in fact a bit like a large set of libraries that processes can (indirectly) use so as not to have to reinvent the wheel, and to abstract themselves from a lot of complexity. We’re glad we can develop a program only once, regardless of the brand of the hard drive or the graphics card, to display a window. Right?
For this code sharing to be possible, within the virtual memory of each process there is a memory zone reserved for the kernel.

All this code is extremely critical since it governs the operation of an operating system, and is therefore not accessible directly by applications.
This is why communications between the user zone and the kernel zone are very codified, and use a system call principle to interact.
System calls
The kernel offers many features to applications, somewhat like an API. For each of these features, an identifier is associated. On the kernel side, there’s a table that maps a number to the associated feature. This table is called the SSDT (System Service Dispatch Table). When a specific instruction is sent by an application, called a syscall, the kernel understands that an action on its part is expected. The kernel (or more precisely the System Service Dispatcher) will then look at the number of the syscall that was sent by the application, and will pass control to the function associated with this number in the SSDT. It’s then the turn of the kernel-side function to execute actions, and to return a value to the application.
Conclusion
We have briefly explained what a process is, and how the code of the executable associated with the process can communicate with the kernel to perform low-level actions. However, we clearly understand that the executable cannot directly execute code on the kernel side, and that’s a good thing. It can only ask to use this or that feature that the kernel is willing to expose.
If processes could execute code on the kernel side, a small error in the code could have disastrous consequences. Critical memory or code necessary for the proper functioning of the operating system could be overwritten. Furthermore, an error in code executed on the kernel side will almost systematically lead to a pure and simple crash of the operating system, with that beautiful screen we all know, the Blue Screen Of Death, or BSOD (which isn’t / isn’t always blue, by the way).

Drivers
There are, however, many reasons why it’s important to be able to execute code on the kernel side. An obvious example concerns hardware manufacturers. For applications to be able to access their devices, manufacturers need to develop code that will be registered in the kernel and that will allow applications to benefit from the device’s features without having to know or understand how the hardware physically works.
Other needs may exist, including one that interests us particularly: the need for EDRs (Endpoint Detection and Response) to monitor everything that happens on the system, and to be able to act if necessary, without applications being able to stop them. Otherwise, it would be too easy.
There are many ways to monitor and manage applications on the user side, and the article A tale of EDR bypass methods by S3cur3Th1sSh1t describes a large part of these techniques, and provides a state of the art of existing bypasses. We quickly understand that what EDRs implement on the user side is often easily bypassed.
However, there’s less documentation on the techniques used by EDRs on the kernel side to monitor what happens on a machine, and bypassing these measures is less straightforward than on the user space side.
To be able to execute code on the kernel side, we’ll look at how a driver works. A driver is a program that will, precisely, be executed in kernel space. Lessgo.
Driver structure
To be able to write a driver, you have to understand how it’s structured. First of all, a driver has an entry point. It’s the function that will be called when this driver is executed in the kernel. In the same way that in C, an executable must have a main function, or a DLL must have a DLLMain, a driver must have a DriverEntry function. This function must return a number indicating whether everything went well or not. This number is of type NTSTATUS. This function also takes two arguments, the first is a pointer to a DriverObject, and the second is a RegistryPath string.
#include <ntddk.h>

NTSTATUS DriverEntry(_In_ PDRIVER_OBJECT DriverObject, _In_ PUNICODE_STRING RegistryPath) {
    return STATUS_SUCCESS;
}
The DriverObject is actually a structure that is partially initialized by the kernel before calling the driver in question. It’s a structure that the driver itself will complete, and that will in particular be used to indicate which features are offered by this driver and where the functions associated with these features are located.
This object must also be completed by indicating where the function that will be called when the driver is removed (Unload) is located. This function is super important since it allows us to clean up everything that must be cleaned up when the driver is stopped. As much as when a user process is stopped, the kernel can clean up behind it and avoid memory leaks, when the leaks are in the kernel, they’ll be there until the next reboot. It’s therefore important to properly manage its memory, and to release it in its unload function.
To declare where the unload function is located, simply indicate it in the DriverObject structure received as a parameter of DriverEntry.
#include <ntddk.h>


void EDRUnload(_In_ PDRIVER_OBJECT DriverObject) {
}


NTSTATUS DriverEntry(_In_ PDRIVER_OBJECT DriverObject, _In_ PUNICODE_STRING RegistryPath) {
    /* We indicate that the EDRUnload function is the function to call when the driver is stopped */
    DriverObject->DriverUnload = EDRUnload;
    return STATUS_SUCCESS;
}
Simple, isn’t it? As soon as we allocate resources, we’ll have to think about freeing them, potentially in this new EDRUnload function we’ve just defined.
Besides managing the driver’s shutdown, features can be defined by the DriverObject. There’s, for example, the fact that an application can perform read operations with this driver. This is, for example, what Process Explorer does when it just reads the currently running processes. This is information collected by the driver, and returned to the application. There are also write operations, or more generic actions that we’ll see later.
These features are called Dispatch Routines. It’s an array of function pointers whose indices are described on Microsoft’s site. We were talking about the read feature, corresponding to the IRP_MJ_READ index, or write IRP_MJ_WRITE, but there are others. Here’s a table giving an overview of the most common ones.
| Index | Description |
|---|---|
| IRP_MJ_CREATE | Create or open operation |
| IRP_MJ_CLOSE | Close operation |
| IRP_MJ_READ | Read operation |
| IRP_MJ_WRITE | Write operation |
| IRP_MJ_DEVICE_CONTROL | Control code calls |
This array is located in the MajorFunction member of the driver object. So, if we want to be able to interact with the driver from a user application, we’ll need at a minimum to implement the function associated with IRP_MJ_CREATE to open the driver, IRP_MJ_CLOSE to close it, and IRP_MJ_READ, IRP_MJ_WRITE and/or IRP_MJ_DEVICE_CONTROL. We’ll see a little later what these control codes correspond to. Let’s start with the first two, which allow us to access the driver.
#include <ntddk.h>

void EDRUnload(_In_ PDRIVER_OBJECT DriverObject);
NTSTATUS EDRCreateClose(_In_ PDEVICE_OBJECT DeviceObject, _In_ PIRP Irp);

NTSTATUS DriverEntry(_In_ PDRIVER_OBJECT DriverObject, _In_ PUNICODE_STRING RegistryPath) {
    /* We indicate that the EDRUnload function is the function to call when the driver is stopped */
    DriverObject->DriverUnload = EDRUnload;

    /* Declaration of methods called when opening and closing the driver */
    DriverObject->MajorFunction[IRP_MJ_CREATE] = EDRCreateClose;
    DriverObject->MajorFunction[IRP_MJ_CLOSE] = EDRCreateClose;
    return STATUS_SUCCESS;
}

void EDRUnload(_In_ PDRIVER_OBJECT DriverObject) {

}

NTSTATUS EDRCreateClose(_In_ PDEVICE_OBJECT DeviceObject, _In_ PIRP Irp) {
    /* Actions are to be taken here to validate opening or closing the driver */
    return STATUS_SUCCESS;
}
You can see that the same function has been used for both operations. Indeed, in most cases, this function only validates the opening or closing of the driver, and there’s no need to add more logic to it. Tests could be done to ensure that it’s a specific user who is performing this opening, but to simplify we’ll use this common function to always validate requests.
We can then add a function associated with IRP_MJ_DEVICE_CONTROL. This feature is very useful since it allows the client application and the driver to communicate through control codes. To simplify, the client can send a LIST, ADD, or CLEAN code for example, and on the driver side, there will be a condition that will test this control code. Depending on its value, this or that action will be taken.
To declare this function, no surprise.
#include <ntddk.h>

void EDRUnload(_In_ PDRIVER_OBJECT DriverObject);
NTSTATUS EDRCreateClose(_In_ PDEVICE_OBJECT DeviceObject, _In_ PIRP Irp);
NTSTATUS EDRDeviceControl(_In_ PDEVICE_OBJECT DeviceObject, _In_ PIRP Irp);

NTSTATUS DriverEntry(_In_ PDRIVER_OBJECT DriverObject, _In_ PUNICODE_STRING RegistryPath) {
    /* Declaration of the method called when the driver is closed */
    DriverObject->DriverUnload = EDRUnload;

    /* Declaration of methods called when opening and closing the driver */
    DriverObject->MajorFunction[IRP_MJ_CREATE] = EDRCreateClose;
    DriverObject->MajorFunction[IRP_MJ_CLOSE] = EDRCreateClose;

    /* Declaration of the method that will handle control codes */
    DriverObject->MajorFunction[IRP_MJ_DEVICE_CONTROL] = EDRDeviceControl;
    return STATUS_SUCCESS;
}

void EDRUnload(_In_ PDRIVER_OBJECT DriverObject) {

}

NTSTATUS EDRCreateClose(_In_ PDEVICE_OBJECT DeviceObject, _In_ PIRP Irp) {
    /* Actions are to be taken here to validate opening or closing the driver */
    return STATUS_SUCCESS;
}

NTSTATUS EDRDeviceControl(_In_ PDEVICE_OBJECT DeviceObject, _In_ PIRP Irp) {
    /* Logic can be implemented here to handle application requests */
    return STATUS_SUCCESS;
}
We’re making progress on the driver structure, but it would be nice to compile it and test it, wouldn’t it?
As it stands, it won’t work, and on top of that, nothing will be visible. So before moving on to a first compilation, let’s add some debug information with the KdPrint function (a macro, to be more exact). This function is used as follows:
KdPrint(("Here's a message!\n"));
Note the double set of parentheses, because it’s a macro and not a function.
Using the DbgView utility from the Sysinternals suite, we’ll be able to read the debug messages we’ve placed in our code.
First compilation
To be able to compile this project, you have to install Visual Studio, the Windows 10 SDK (with the debugging tools), and the Windows 10 Driver Kit, to be installed last so that it properly installs the extension in Visual Studio. There may be other ways to do it, but personally in this order it worked well for me.
You then need to create a Visual Studio project of type Empty WDM Driver.

An EDR.inf file was generated when this project was created, but we don’t need it so we can delete it.

Then, you can create a source file, for example Edr.cpp in the Sources folder.

You can then copy the driver skeleton we’ve created so far. Note, however, that the project won’t compile in this state. Indeed, when compiling a driver, the compiler returns errors when certain warnings are encountered. An example of a warning treated as an error is the one indicating that a variable is not used. To avoid this error, the UNREFERENCED_PARAMETER macro can be used to indicate that we know this parameter exists, but we’re not going to use it.
Furthermore, the DriverEntry function must be exported during compilation without its name being modified. However, C++ allows method overloading, and renames methods with various information to manage these overloads. To avoid this behavior, the extern "C" instruction must be added just before the DriverEntry function.
Finally, let’s add some debug information with the KdPrint function.
#include <ntddk.h>

void EDRUnload(_In_ PDRIVER_OBJECT DriverObject);
NTSTATUS EDRCreateClose(_In_ PDEVICE_OBJECT DeviceObject, _In_ PIRP Irp);
NTSTATUS EDRDeviceControl(_In_ PDEVICE_OBJECT DeviceObject, _In_ PIRP Irp);

extern "C"
NTSTATUS DriverEntry(_In_ PDRIVER_OBJECT DriverObject, _In_ PUNICODE_STRING RegistryPath) {
    UNREFERENCED_PARAMETER(RegistryPath);

    KdPrint(("The driver has been started\n"));

    /* Declaration of the method called when the driver is closed */
    DriverObject->DriverUnload = EDRUnload;

    /* Declaration of methods called when opening and closing the driver */
    DriverObject->MajorFunction[IRP_MJ_CREATE] = EDRCreateClose;
    DriverObject->MajorFunction[IRP_MJ_CLOSE] = EDRCreateClose;
    DriverObject->MajorFunction[IRP_MJ_DEVICE_CONTROL] = EDRDeviceControl;

    KdPrint(("The driver has been correctly initialized\n"));
    return STATUS_SUCCESS;
}

void EDRUnload(_In_ PDRIVER_OBJECT DriverObject) {
    UNREFERENCED_PARAMETER(DriverObject);
    KdPrint(("The driver has been stopped\n"));
}

NTSTATUS EDRCreateClose(_In_ PDEVICE_OBJECT DeviceObject, _In_ PIRP Irp) {
    UNREFERENCED_PARAMETER(DeviceObject);
    UNREFERENCED_PARAMETER(Irp);

    KdPrint(("The driver has been opened or closed\n"));
    /* Actions are to be taken here to validate opening or closing the driver */
    return STATUS_SUCCESS;
}

NTSTATUS EDRDeviceControl(_In_ PDEVICE_OBJECT DeviceObject, _In_ PIRP Irp) {
    UNREFERENCED_PARAMETER(DeviceObject);
    UNREFERENCED_PARAMETER(Irp);

    KdPrint(("A control code has been sent to the driver\n"));
    /* Logic can be implemented here to handle application requests */
    return STATUS_SUCCESS;
}
One last little step before being able to compile the driver: we have to disable a compilation protection against certain attacks. It’s better to have the elements that allow us to perform the checks, but for our testing needs, we’ll just disable the option.

Now, the driver can be compiled! This compilation produces in particular an EDR.sys file, which is the driver we’ll be able to load. It does nothing, but that’s already a lot.

Loading the driver
So we’ve compiled our first driver, EDR.sys. Unfortunately (or fortunately) we cannot load it directly into our kernel. Recent versions of Windows require several prerequisites to accept loading a driver, notably that it be signed by a certificate authority recognized by Microsoft, and signed by Microsoft itself! Do we stop there then?
Since we’re in a research and learning phase, there’s a solution to load our driver anyway. For that, I extremely strongly advise you to do your tests in a virtual machine, or at least on a test machine. As a reminder, if your driver crashes, it makes the machine crash. No half measures.
Once your test machine is launched, you can put it in development mode, which means it will accept loading unsigned drivers. To do this, simply run the following command in a console as an administrator:
bcdedit /set testsigning on
After a reboot, your machine is ready to install your driver, we’re getting there! I also advise you to download the DbgView utility from the Sysinternals suite we mentioned earlier, as it will allow you to see the messages sent by your KdPrint functions.

Then, to register your driver, the sc.exe command can be used as follows:
sc.exe create EDR type= kernel binPath= C:\path\to\EDR.sys
Note the spaces after the = signs, they are important for the command line, do not remove them.
Once the driver is registered, it can be started, using the start command of sc.exe
sc.exe start EDR

The debug messages should then appear in the Dbgview console.

So we have indeed entered the DriverEntry routine and our methods have been properly registered. None of these registered methods have been called, however, and that’s normal. On the other hand, if we stop the driver, then the EDRUnload method will be called.
sc.exe stop EDR

Everything went smoothly, congratulations, you have developed, launched and stopped your first driver under Windows!
Conclusion
In this first part, we saw what user space and kernel space were, and we defined a few important terms for the rest of this series. While how an EDR works on the user side has been extremely well described in an article by S3cur3th1ssh1t, we pointed out how executing code on the kernel side could be a big advantage for EDRs.
We then described what a driver was, and detailed the basic structure that allows a driver to be compiled and loaded. We’ll start from this skeleton in the next parts to put into practice features offered by the kernel to monitor and even modify the behavior of applications on the user side. This same structure can be used in the third part which will describe how to write a driver allowing us to bypass, or remove these protections.
I’ll see you for part 2 of this series!