NTLM Relay
NTLM relay is a technique of standing between a client and a server to perform actions on the server while impersonating the client. It can be very powerful and can be used to take control of an Active Directory domain from a black box context (no credentials). The purpose of this article is to explain NTLM relay, and to present its limits.
Preliminary
This article is not meant to be a tutorial to be followed in order to carry out a successful attack, but it will allow the reader to understand in detail the technical details of this attack, its limitations, and can be a basis to start developing his own tools, or understand how current tools work.
In addition, and to avoid confusion, here are some reminders:
- NT Hash and LM Hash are hashed versions of user passwords. LM hashes are totally obsolete, and will not be mentioned in this article. NT hash is commonly called, wrongly in my opinion, “NTLM hash”. This designation is confusing with the protocol name, NTLM. Thus, when we talk about the user’s password hash, we will refer to it as NT hash.
- NTLM is therefore the name of the authentication protocol. It also exists in version 2. In this article, if the version affects the explanation, then NTLMv1 and NTLMv2 will be the terms used. Otherwise, the term NTLM will be used to group all versions of the protocol.
- NTLMv1 Response and NTLMv2 Response will be the terminology used to refer to the challenge response sent by the client, for versions 1 and 2 of the NTLM protocol.
- Net-NTLMv1 and Net-NTLMv2 are pseudo-neo-terminologies used when the NT hash is called NTLM hash in order to distinguish the NTLM hash from the protocol. Since we do not use the NTLM hash terminology, these two terminologies will not be used.
- Net-NTLMv1 Hash and Net-NTLMv2 Hash are also terminologies to avoid confusion, but will also not be used in this article.
Introduction
NTLM relay relies, as its name implies, on NTLM authentication. The basics of NTLM have been presented in pass-the-hash article. I invite you to read at least the part about NTLM protocol and local and remote authentication.
As a reminder, NTLM protocol is used to authenticate a client to a server. What we call client and server are the two parts of the exchange. The client is the one that wishes to authenticate itself, and the server is the one that validates this authentication.
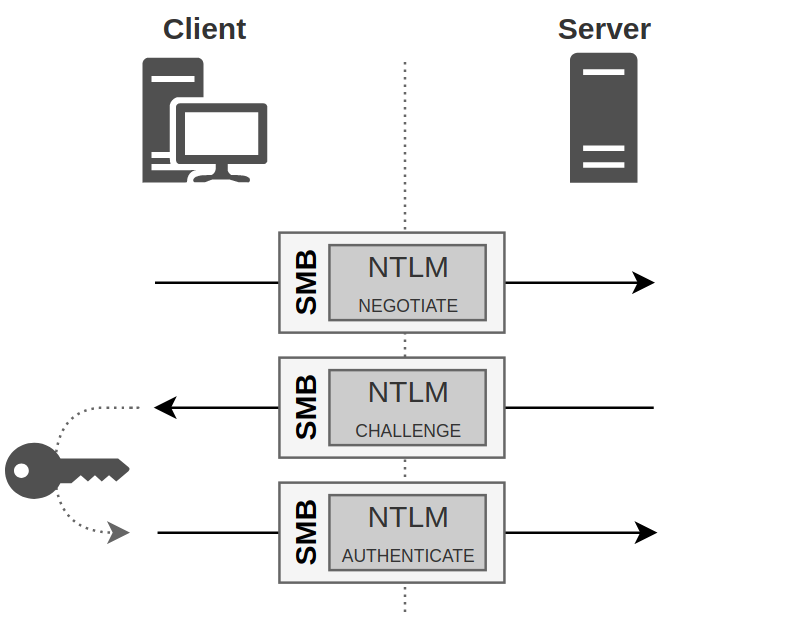
This authentication takes place in 3 steps:
- First the client tells the server that it wants to authenticate.
- The server then responds with a challenge which is nothing more than a random sequence of characters.
- The client encrypts this challenge with its secret, and sends the result back to the server. This is its response.
This process is called challenge/response.
The advantage of this exchange is that the user’s secret never passes through the network. This is known as Zero-knowledge proof.
NTLM Relay
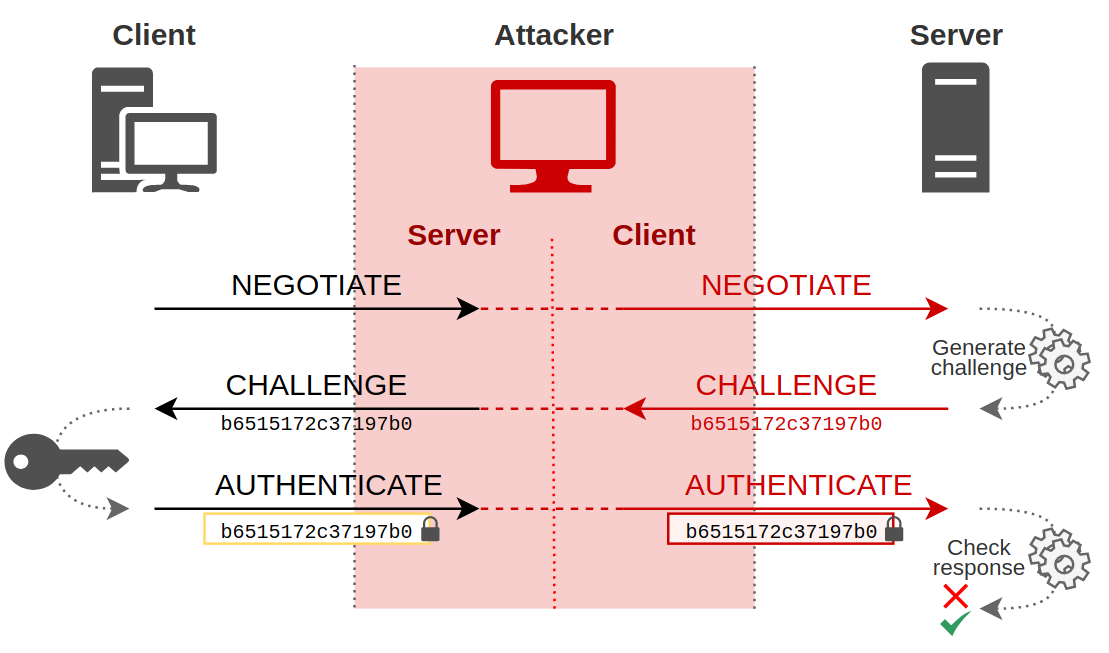
With this information, we can easily imagine the following scenario: An attacker manages to be in a man-in-the-middle position between a client and a server, and simply relays information from one to the other.
The man-in-the-middle position means that from the client’s point of view, the attacker’s machine is the server to which he wants to authenticate, and from the server’s point of view, the attacker is a client like any other who wants to authenticate.
Except that the attacker does not “just” want to authenticate to the server. He wishes to do so by pretending to be the client. However, he does not know the secret of the client, and even if he listens to the conversations, as this secret is never transmitted over the network (zero-knowledge proof), the attacker is not able to extract any secret. So, how does it work?
Message Relaying
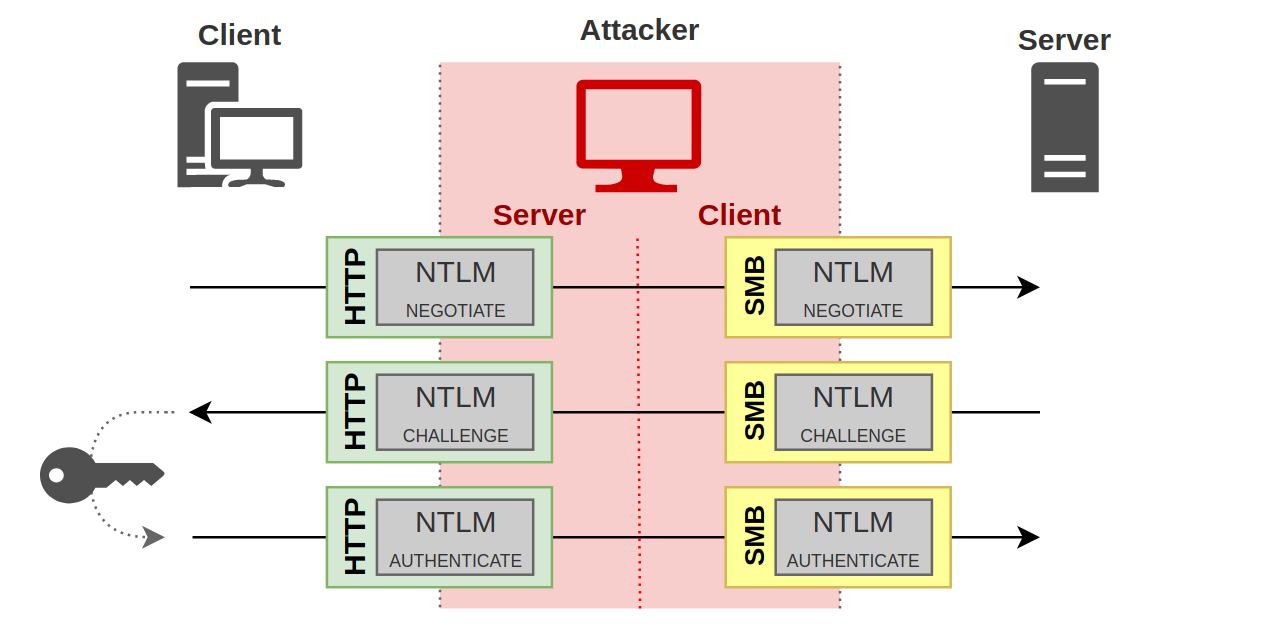
During NTLM authentication, a client can prove to a server its identity by encrypting with its password some piece of information provided by the server. So the only thing the attacker has to do is to let the client do its work, and passing the messages from the client to the server, and the replies from the server to the client.
All the client has to send to the server, the attacker will receive it, and he will send the messages back to the real server, and all the messages that the server sends to the client, the attacker will also receive them, and he will forward them to the client, as is.
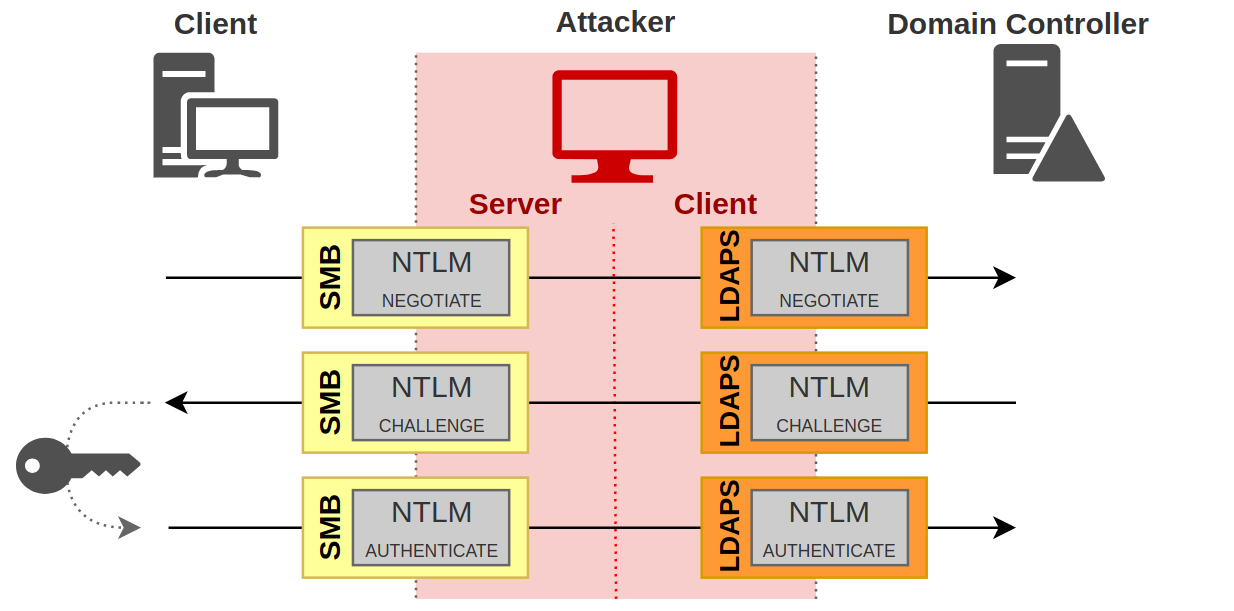
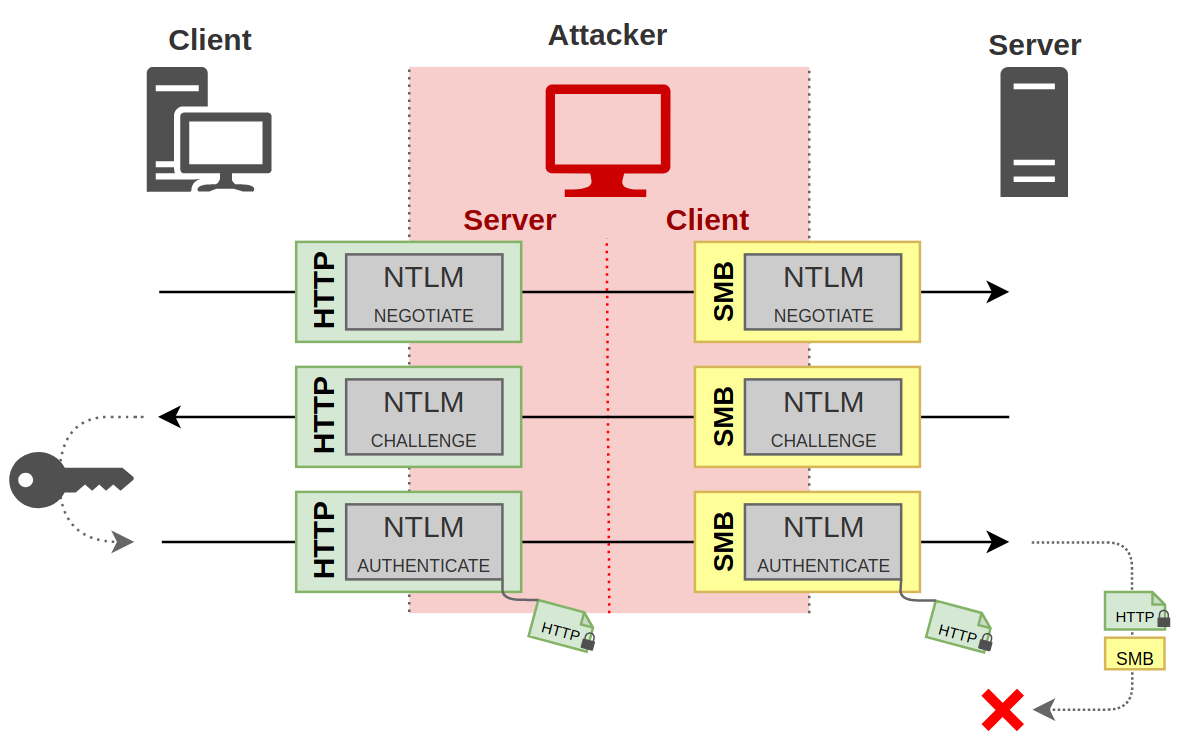
And it’s all working out! Indeed, from the client’s point of view, on the left part on the diagram, an NTLM authentication takes place between the attacker and him, with all the necessary bricks. The client sends a negotiate request in its first message, to which the attacker replies with a challenge. Upon receiving this challenge, the client builds its response using its secret, and finally sends the last authentication message containing the encrypted challenge.
Ok, that’s great but the attacker cannot do anything with this exchange. Fortunately, there is the right side of the diagram. Indeed, from the server’s point of view, the attacker is a client like any other. He sent a first message to ask for authentication, and the server responded with a challenge. As the attacker sent this same challenge to the real client, the real client encrypted this challenge with its secret, and responded with a valid response. The attacker can therefore send this valid response to the server.
This is where the interest of this attack lies. From the server’s point of view, the attacker has authenticated himself using the victim’s secret, but in a transparent way for the server. It has no idea that the attacker was replaying his messages to the client in order to get the client to give him the right answers.
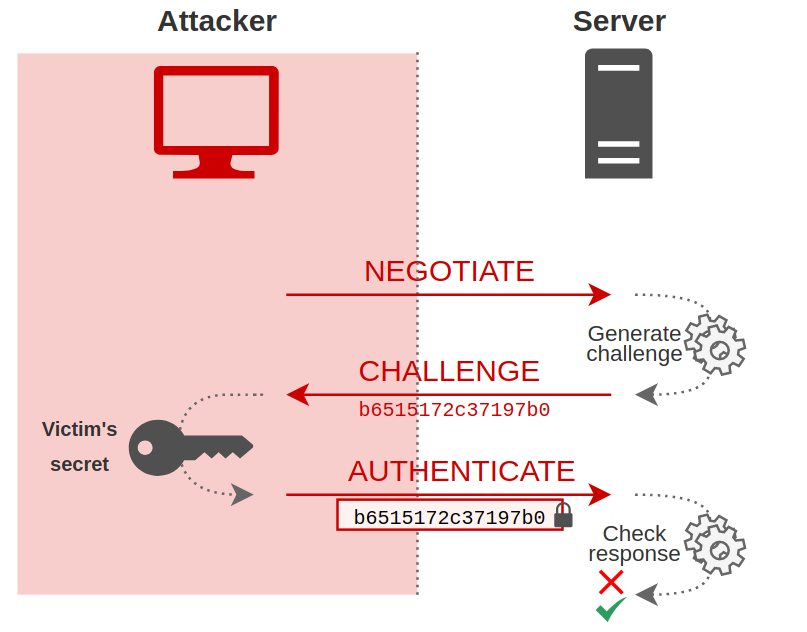
So, from the server’s point of view, this is what happened:
At the end of these exchanges, the attacker is authenticated on the server with the client’s credentials.
Net-NTLMv1 and Net-NTLMv2
For information, it is this valid response relayed by the attacker in message 3, the encrypted challenge, that is commonly called Net-NTLMv1 hash or Net-NTLMv2 hash. But in this article, it will be called NTLMv1 response or NTLMv2 response, as indicated in the preliminary paragraph.
To be exact, this is not exactly an encrypted version of the challenge, but a hash that uses the client’s secret. It is HMAC_MD5 function which is used for NTLMv2 for example. This type of hash can only be broken by brute force. The cryptography associated with computation of the NTLMv1 hash is obsolete, and the NT hash that was used to create the hash can be retrieved very quickly. For NTLMv2, on the other hand, it takes much longer. It is therefore preferable and advisable not to allow NTLMv1 authentication on a production network.
In practice
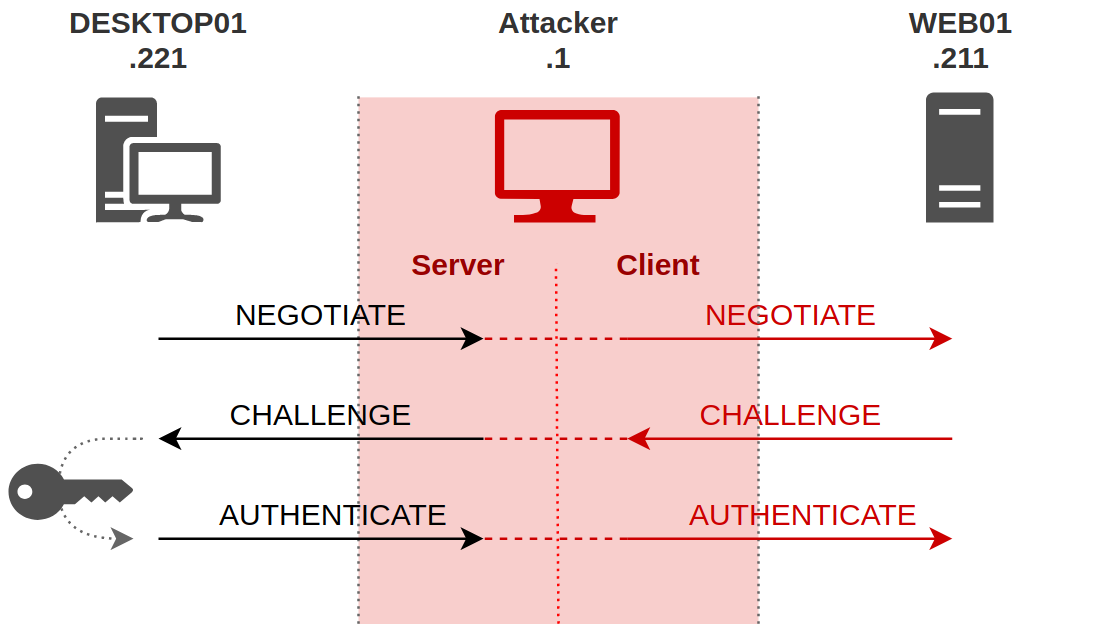
As an example, I set up a small lab with several machines. There is DESKTOP01 client with IP address 192.168.56.221 and WEB01 server with IP address 192.168.56.211. My host is the attacker, with IP address 192.168.56.1. So we are in the following situation:
The attacker has therefore managed to put himself man-in-the-middle position. There are different techniques to achieve this, whether through abuse of default IPv6 configurations in a Windows environment, or through LLMNR and NBT-NS protocols. Either way, the attacker makes the client think that he is the server. Thus, when the client tries to authenticate itself, it is with the attacker that it will perform this operation.
The tool I used to perform this attack is ntlmrelayx from impacket. This tool is presented in details in this article by Agsolino, impacket (almighty) developer.
ntlmrelayx.py -t 192.168.56.211
The tool creates different servers, including an SMB server for this example. If it receives a connection on this server, it will relay it to the provided target, which is 192.168.56.211 in this example.
From a network point of view, here is a capture of the exchange, with the attacker relaying the information to the target.
In green are the exchanges between DESKTOP01 client and the attacker, and in red are the exchanges between the attacker and WEB01 server. We can clearly see the 3 NTLM messages between DESKTOP01 and the attacker, and between the attacker and WEB01 server.
And to understand the notion of relay, we can verify that when WEB01 sends a challenge to the attacker, the attacker sends back exactly the same thing to DESKTOP01.
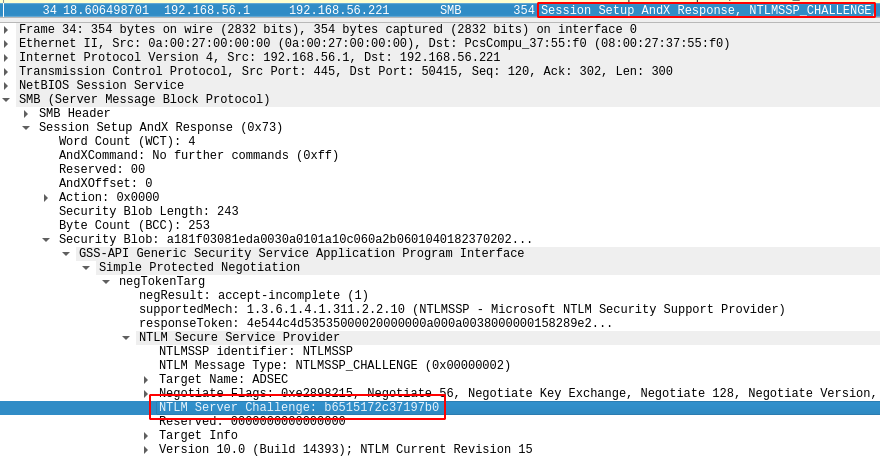
Here is the challenge sent by WEB01 to the attacker :
When the attacker receives this challenge, he sends it to DESKTOP01 without any modification. In this example, the challenge is b6515172c37197b0.
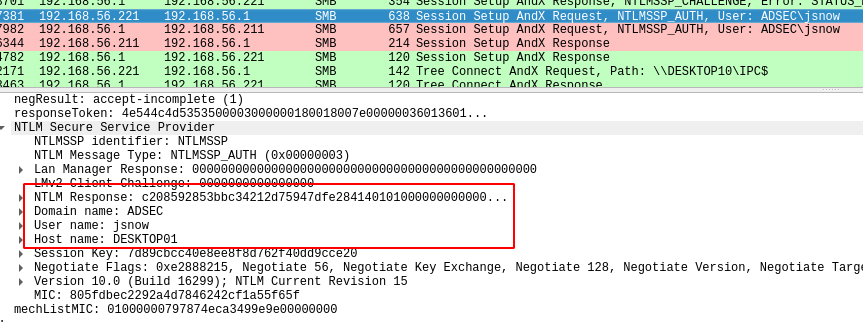
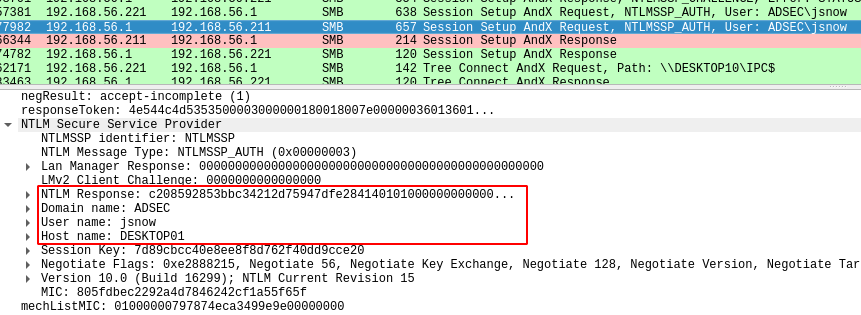
The client will then compute the response using his secret, as we have seen in the previous paragraphs, and he will send his response alongside with his username (jsnow), his hostname (DESKTOP01), and in this example he indicates that he is a domain user, so he provides the domain name (ADSEC).
The attacker who gets all that doesn’t ask questions. He sends the exact same information to the server. So he pretends to be jsnow on DESKTOP01 and part of ADSEC domain, and he also sends the response that has been computed by the client, called NTLM Response in these screenshots. We call this response NTLMv2 hash.
We can see that the attacker was only relaying stuff. He just relayed the information from the client to the server and vice versa, except that in the end, the server thinks that the attacker is successfully authenticated, and the attacker can then perform actions on the server on behalf of ADSEC\jsnow.
Authentication vs Session
Now that we have understood the basic principle of NTLM relay, the question that arises is how, concretely, can we perform actions on a server after relaying NTLM authentication? By the way, what do we mean by “actions”? What is it possible to do?
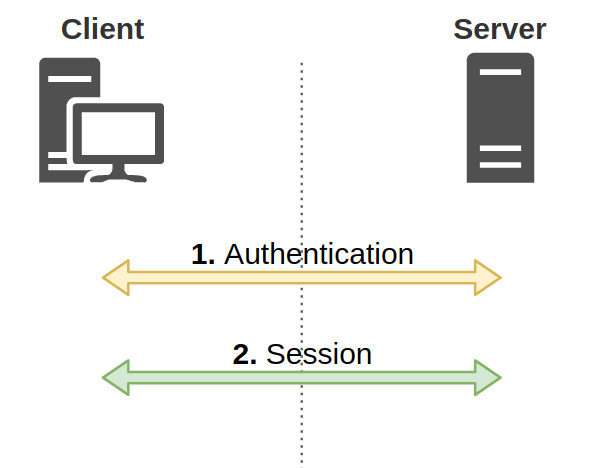
To answer this question, we must first clarify one fundamental thing. When a client authenticates to a server to do something, we must distinguish two things:
- Authentication, allowing the server to verify that the client is who he claims to be.
- The session, during which the client will be able to perform actions.
Thus, if the client has authenticated correctly, it will then be able to access the resources offered by the server, such as network shares, access to an LDAP directory, an HTTP server or a SQL database. This list is obviously not exhaustive.
To manage these two steps, the protocol that is used must be able to encapsulate the authentication, thus the exchange of NTLM messages.
Of course, if all the protocols were to integrate NTLM technical details, it would quickly become a holy mess. That’s why Microsoft provides an interface that can be relied on to handle authentication, and packages have been specially developed to handle different types of authentication.
SSPI & NTLMSSP
The SSPI interface, or Security Support Provider Interface, is an interface proposed by Microsoft to standardize authentication, regardless of the type of authentication used. Different packages can connect to this interface to handle different types of authentication.
In our case, it is the NTLMSSP package (NTLM Security Support Provider) that interests us, but there is also a package for Kerberos authentication, for example.
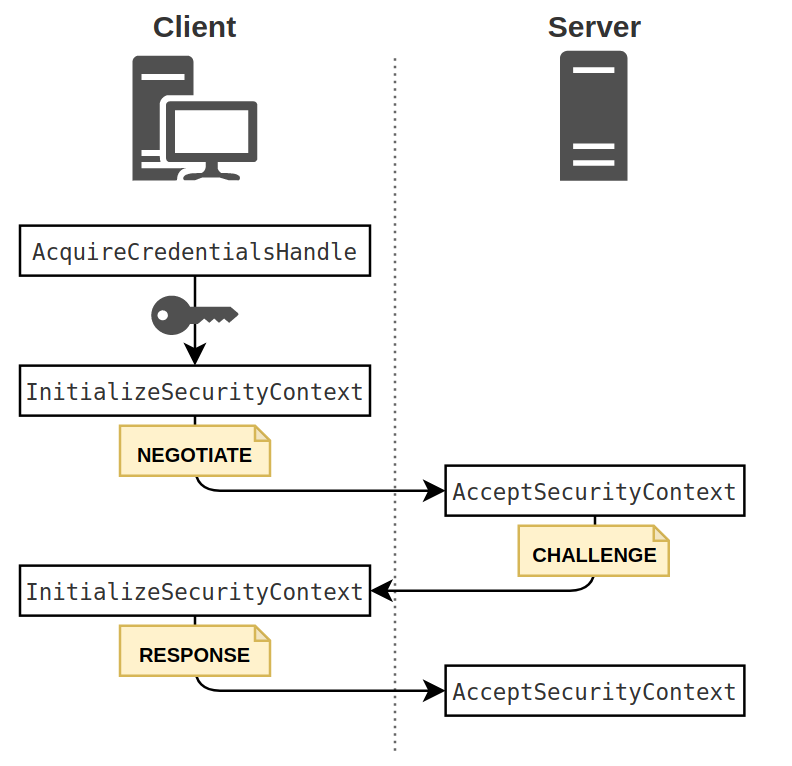
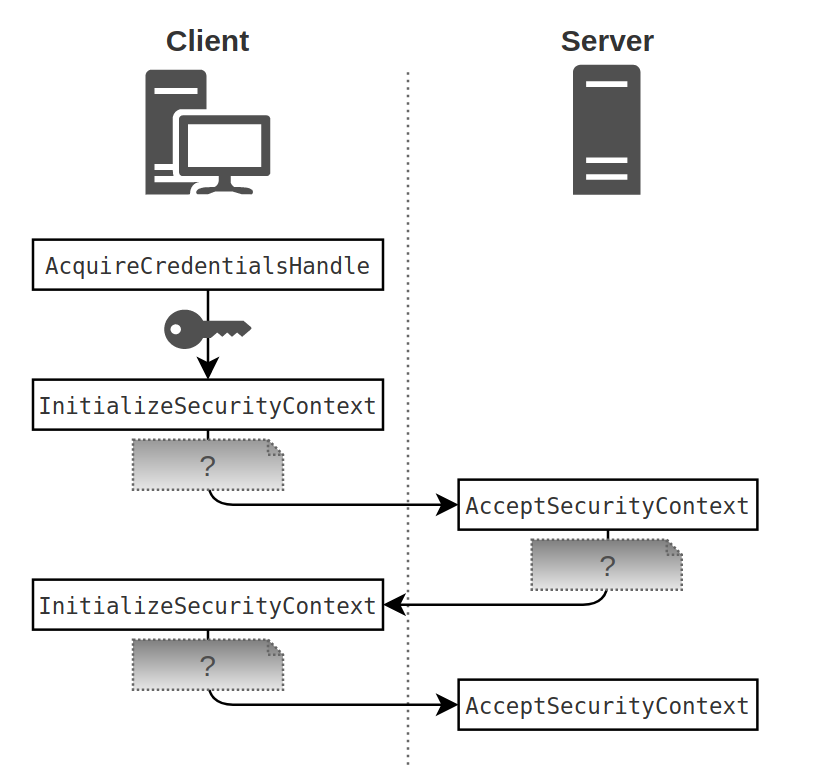
Without going into details, the SSPI interface provides several functions, including AcquireCredentialsHandle, InitializeSecurityContext and AcceptSecurityContext.
During NTLM authentication, both the client and the server will use these functions. The steps are only briefly described here.
- The client calls
AcquireCredentialsHandlein order to gain indirect access to the user credentials. - The client then calls
InitializeSecurityContext, a function which, when called for the first time, will create a message of type 1, thus of type NEGOTIATE. We know this because we’re interested in NTLM, but for a programmer, it doesn’t matter what this message is. All that matters is to send it to the server. - The server, when receiving the message, calls the
AcceptSecurityContextfunction. This function will then create the type 2 message, the CHALLENGE. - When receiving this message, the client will call
InitializeSecurityContextagain, but this time passing the CHALLENGE as an argument. The NTLMSSP package takes care of everything to compute the response by encrypting the challenge, and will produce the last AUTHENTICATE message. - Upon receiving this last message, the server also calls
AcceptSecurityContextagain, and the authentication verification will be performed automatically.
The reason these steps are explained is to show that in reality, from the client or server point of view, the structure of the 3 messages that are exchanged does not matter. We, with our knowledge of the NTLM protocol, know what these messages correspond to, but both the client and the server don’t care. These messages are described in the Microsoft documentation as opaque tokens.
This means that these 5 steps are completely independent of client’s type or server’s type. They work regardless of the protocol used as long as the protocol has something in place to allow this opaque structure to be exchanged in one way or another from the client to the server.
So the protocols have adapted to find a way to put an NTLMSSP, Kerberos, or other authentication structure into a specific field, and if the client or server sees that there is data in that field, it just passes it to InitializeSecurityContext or AcceptSecurityContext.
This point is quite important, since it clearly shows that the application layer (HTTP, SMB, SQL, …) is completely independent from the authentication layer (NTLM, Kerberos, …). Therefore, security measures are both needed for the authentication layer and for the application layer.
For a better understanding, we will see the two examples of application protocols SMB and HTTP. It’s quite easy to find documentation for other protocols. It’s always the same principle.
Integration with HTTP
This is what a basic HTTP request looks like.
GET /index.html HTTP/1.1
Host: beta.hackndo.com
User-Agent: Mozilla/5.0
Accept: text/html
Accept-Language: fr
The mandatory elements in this example are the HTTP verb (GET), the path to the requested page (/index.html), the protocol version (HTTP/1.1), or the Host header (Host: beta.hackndo.com).
But it is quite possible to add other arbitrary headers. At best, the remote server is aware that these headers will be present, and it will know how to handle them, and at worst it will ignore them. This allows you to have the same request with some additional information.
GET /index.html HTTP/1.1
Host: beta.hackndo.com
User-Agent: Mozilla/5.0
Accept: text/html
Accept-Language: en
X-Name: pixis
Favorite-Food: Beer 'coz yes, beer is food
It is this feature that is used to be able to transfer NTLM messages from the client to the server. It has been decided that the client sends its messages in a header called Authorization and the server in a header called WWW-Authenticate. If a client attempts to access a web site requiring authentication, the server will respond by adding the WWW-Authenticate header, and highlighting the different authentication mechanisms it supports. For NTLM, it will simply say NTLM.
The client, knowing that NTLM authentication is required, will send the first message in the Authorization header, encoded in base 64 because the message does not only contain printable characters. The server will respond with a challenge in the WWW-Authenticate header, the client will compute the response and will send it in Authorization. If authentication is successful, the server will usually return a 200 return code indicating that everything went well.
> GET /index.html HTTP/1.1
> Host: beta.hackndo.com
> User-Agent: Mozilla/5.0
> Accept: text/html
> Accept-Language: en

  < HTTP/1.1 401 Unauthorized
  < WWW-Authenticate: NTLM
  < Content type: text/html
  < Content-Length: 0

> GET /index.html HTTP/1.1
> Host: beta.hackndo.com
> User-Agent: Mozilla/5.0
> Accept: text/html
> Accept-Language: en
=> Authorization: NTLM <NEGOTIATE in base 64>

  < HTTP/1.1 401 Unauthorized
  => WWW-Authenticate: NTLM <CHALLENGE in base 64>
  < Content type: text/html
  < Content-Length: 0

> GET /index.html HTTP/1.1
> Host: beta.hackndo.com
> User-Agent: Mozilla/5.0
> Accept: text/html
> Accept-Language: en
=> Authorization: NTLM <RESPONSE in base 64>

  < HTTP/1,200 OKAY.
  < WWW-Authenticate: NTLM
  < Content type: text/html
  < Content-Length: 0
  < Connection: close
As long as the TCP session is open, authentication will be effective. As soon as the session closes, however, the server will no longer have the client’s security context, and a new authentication will have to take place. This can often happen, and thanks to Microsoft’s SSO (Single Sign On) mechanisms, it is often transparent to the user.
Integration with SMB
Let’s take another example frequently encountered in a company network. It is SMB protocol, used to access network shares, but not only.
SMB protocol works by using commands. They are documented by Microsoft, and there are many of them. For example, there are SMB_COM_OPEN, SMB_COM_CLOSE or SMB_COM_READ, commands to open, close or read a file.
SMB also has a command dedicated to configuring an SMB session, and this command is SMB_COM_SESSION_SETUP_ANDX. Two fields are dedicated to the contents of the NTLM messages in this command.
- LM/LMv2 Authentication: OEMPassword
- NTLM/NTLMv2 authentication: UnicodePassword
What is important to remember is that there is a specific SMB command with an allocated field for NTLM messages.
Here is an example of an SMB packet containing the response of a server to an authentication.
These two examples show that the content of NTLM messages is protocol-independent. It can be included in any protocol that supports it.
It is then very important to clearly distinguish the authentication part, i.e. the NTLM exchanges, from the application part, or the session part, which is the continuation of the exchanges via the protocol used once the client is authenticated, like browsing a website via HTTP or accessing files on a network share if we use SMB.
As this information is independent, it means that a man-in-the-middle may very well receive authentication via HTTP, for example, and relay it to a server but using SMB. This is called cross-protocol relay.
With all these aspects in mind, the following chapters will highlight the various weaknesses that exist or have existed, and the security mechanisms that come into play to address them.
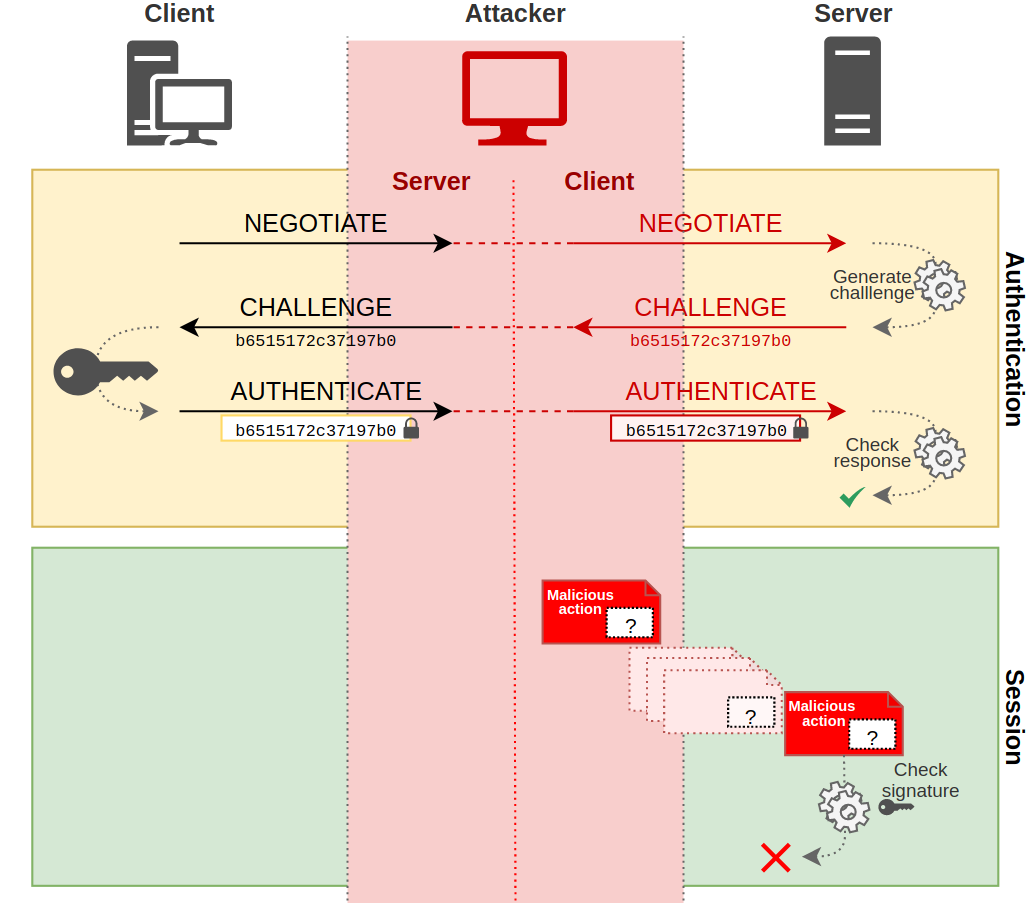
Session signing
Principle
A signature is an authenticity verification method, and it ensures that the item has not been tampered with between sending and receiving. For example, if the user jdoe sends the text I love hackndo, and digitally signs this document, then anyone who receives this document and his signature can verify that it was jdoe who edited it, and can be assured that he wrote this sentence, and not another, since the signature guarantees that the document has not been modified.
The signature principle can be applied to any exchange, as long as the protocol supports it. This is for example the case of SMB, LDAP and even HTTP. In practice, the signing of HTTP messages is rarely implemented.
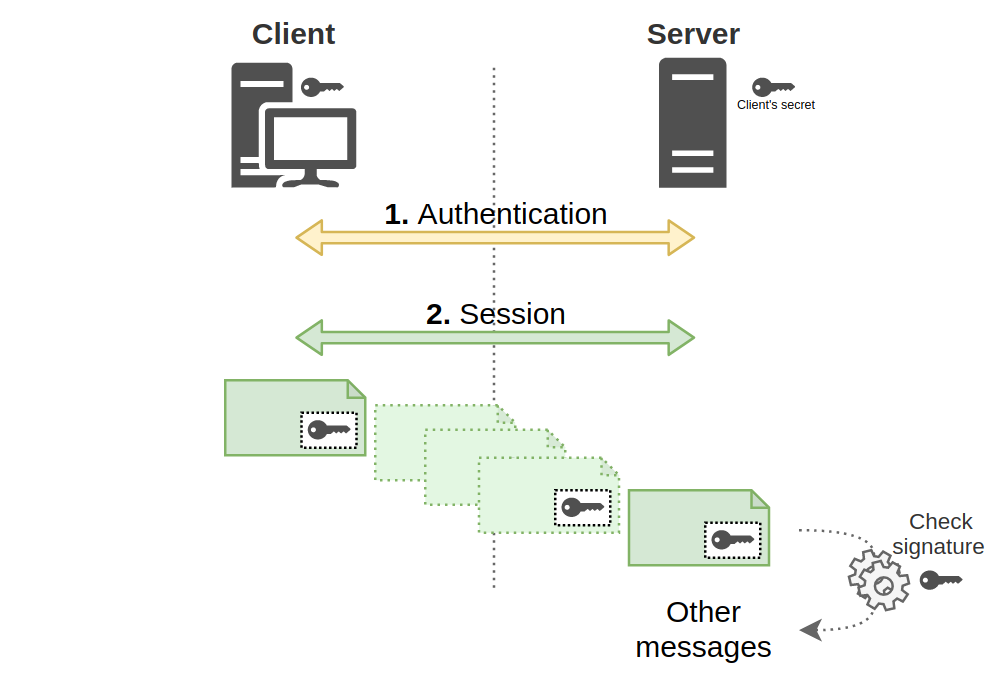
But then, what’s the point of signing packages? Well, as discussed earlier, session and authentication are two separate steps when a client wants to use a service. Since an attacker can be in a man-in-the-middle position and relay authentication messages, he can impersonate the client when talking with the server.
This is where signing comes into play. Even if the attacker has managed to authenticate to the server as the client, he will not be able to sign packets, regardless of authentication. Indeed, in order to be able to sign a packet, one must know the secret of the client.
In NTLM relay, the attacker wants to pretend to be a client, but he has no knowledge of his secret. He is therefore unable to sign anything on behalf of the client. Since he can’t sign any packet, the server receiving packets will either see that the signature is not present, or that it doesn’t exist, and will reject the attacker’s request.
So you understand that if packets must necessarily be signed after authentication, then the attacker can no longer operate, since he has no knowledge of the client’s secret. So the attack will fail. This is a very effective measure to protect against NTLM relay.
That’s all very well, but how do the client and the server agree on whether or not to sign packets? Well that’s a very good question. Yes, I know, I’m the one asking it, but that doesn’t make it irrelevant.
There are two things that come into play here.
- The first one is to indicate if signing is supported. This is done during NTLM negotiation.
- The second one allows to indicate if signing will be required, optional or disabled. This is a setting that is done at the client and server level.
NTLM Negotiation
This negotiation allows to know if the client and/or the server support signing (among other things), and is done during the NTLM exchange. So I lied to you a bit earlier, authentication and session are not completely independent. (By the way, I said that since it was independent, you could change protocol when relaying, but there are limits, we will see them in the chapter on MIC in NTLM authentication).
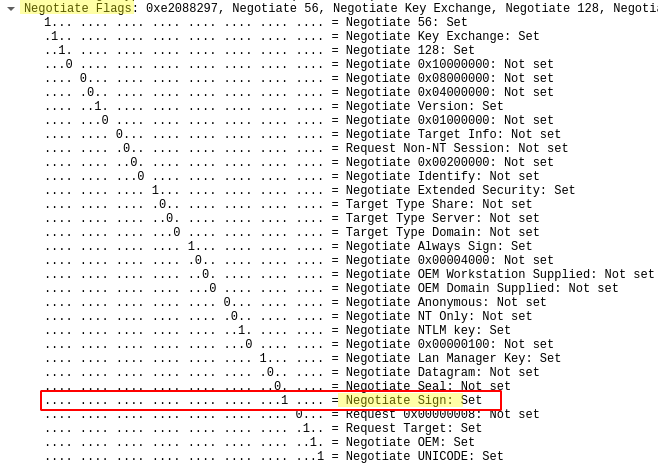
In fact, in NTLM messages, there is other information other than a challenge and the response that are exchanged. There are also negotiation flags, or Negotiate Flags. These flags indicate what the sending entity supports.
There are several flags, but the one of interest here is NEGOTIATE_SIGN.
When this flag is set to 1 by the client, it means that the client supports signing. Be careful, it does not mean that he will necessarily sign his packets. Just that he’s capable of it.
Similarly when the server replies, if it supports signing then the flag will also be set to 1.
This negotiation thus allows each of the two parties, client and server, to indicate to the other if it is able sign packets. For some protocols, even if the client and the server support signing, this does not necessarily mean that the packets will be signed.
Implementation
Now that we’ve seen how both parties indicate to the other their ability to sign packets, they have to agree on it. This time, this decision is made according to the protocol. So it will be decided differently for SMBv1, for SMBv2, or LDAP. But the idea remains the same.
Depending on the protocol, there are usually 2 or even 3 options that can be set to decide wether signing will be enforced, or not. The 3 options are :
- Disabled: This means that signing is not managed.
- Enabled: This option indicates that the machine can handle signing if need be, but it does not require signing.
- Mandatory: This finally indicates that signing is not only supported, but that packets must be signed in order for the session to continue.
We will see here the example of two protocols, SMB and LDAP.
SMB
Signature matrix
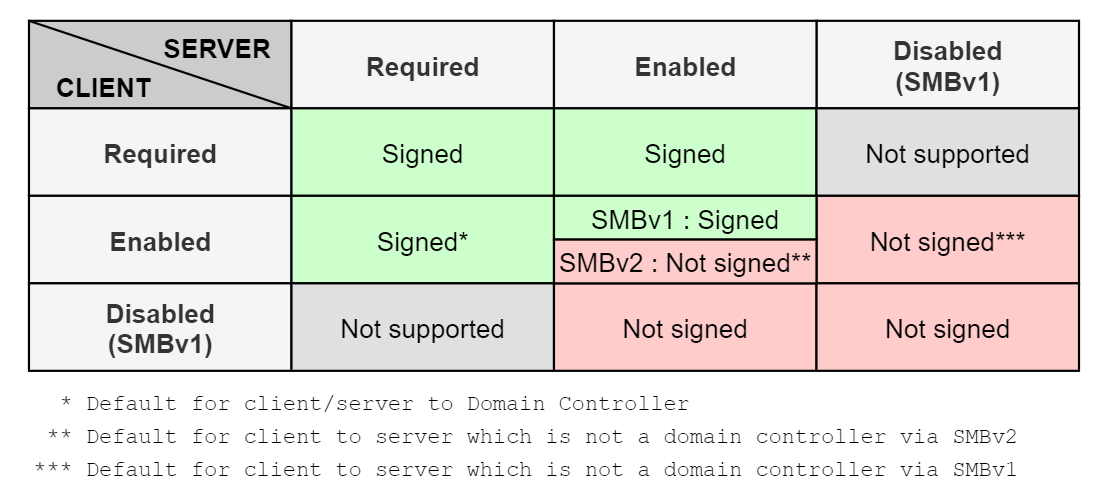
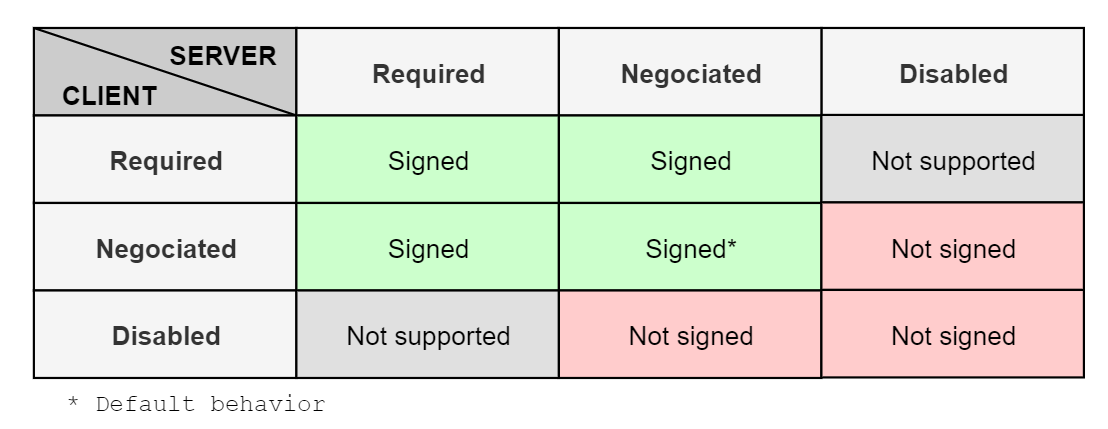
A matrix is provided in Microsoft documentation to determine whether or not SMB packets are signed based on client-side and server-side settings. I’ve reported it in this table. Note however that for SMBv2 and higher, signing is necessarily handled, the Disabled parameter no longer exists.
There is a difference when client and server have the Enabled setting. In SMBv1, the default setting for servers was Disabled. Thus, all SMB traffic between clients and servers was not signed by default. This avoided overloading the servers by preventing them from computing signatures each time an SMB packet was sent. As the Disabled status no longer exists for SMBv2, and servers are now Enabled by default, in order to keep this load saving, the behavior between two Enable entites has been modified, and signing is no longer required in this case. The client and/or the server must necessarily require the signature for SMB packets to be signed.
Settings
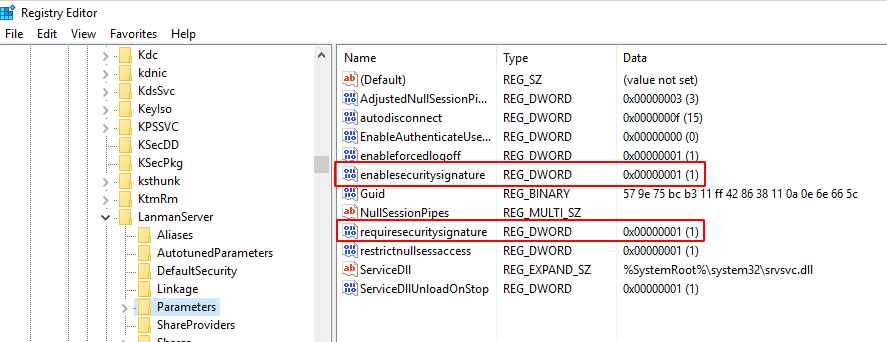
In order to change the default signing settings on a server, the EnableSecuritySignature and RequireSecuritySignature keys must be changed in registry hive HKEY_LOCAL_MACHINE\System\CurrentControlSet\Services\LanmanServer\Parameters.
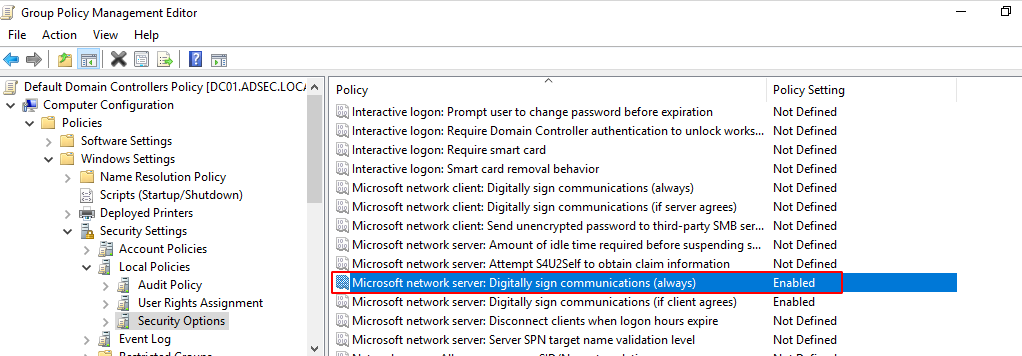
This screenshot was taken on a domain controller. By default, domain controllers require SMB signing when a client authenticates to them. Indeed, the GPO applied to domain controllers contains this entry:
On the other hand, we can see on this capture that above this setting, the same parameter applied to Microsoft network client is not applied. So when the domain controller acts as an SMB server, SMB signing is required, but if a connection comes from the domain controller to a server, SMB signing is not required.
Setup
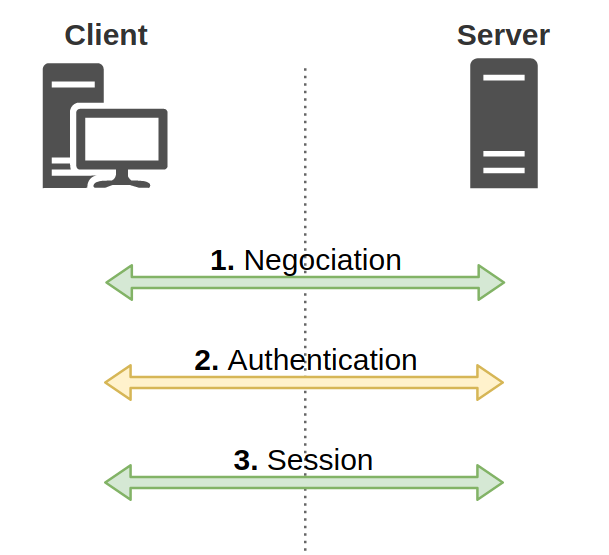
Now that we know where SMB signing is configured, we can see this parameter applied during an communication. It is done just before authentication. In fact, when a client connects to the SMB server, the steps are as follows:
- Negotiation of the SMB version and signing requirements
- Authentication
- SMB session with negotiated parameters
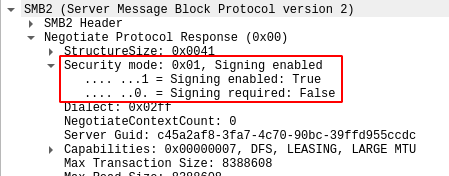
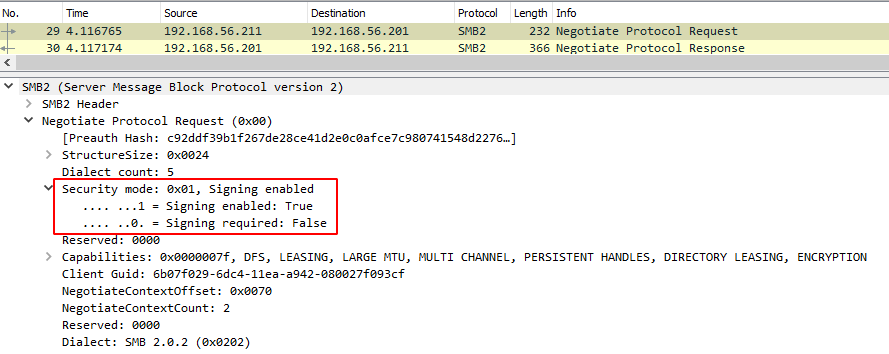
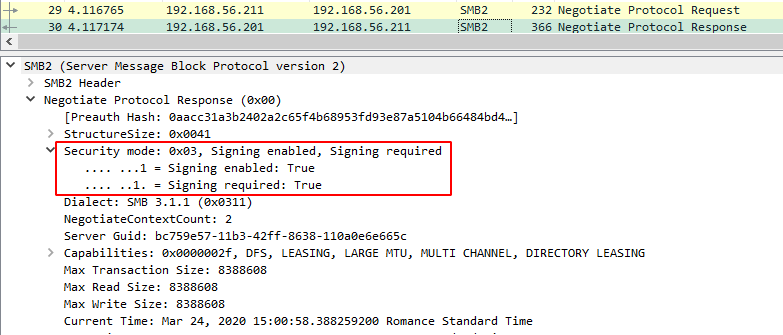
Here is an example of SMB signing negotiation:
We see a response from a server indicating that it has the Enable parameter, but that it does not require signing.
To summarize, here is how a negotiation / authentication / session takes place :
- In the negotiation phase, both parties indicate their requirements: Is signing required for one of them?
- In the authentication phase, both parties indicate what they support. Are they capable of signing?
- In the session phase, if the capabilities and the requirements are compatible, the session is carried out applying what has been negotiated.
For example, if DESKTOP01 client wants to communicate with DC01 domain controller, DESKTOP01 indicates that it does not require signing, but that that he can handle it, if needed.
DC01 indicates that not only he supports signing, but that he requires it.
During negotiation phase, the client and server set the NEGOTIATE_SIGN flag to 1 since they both support signing.
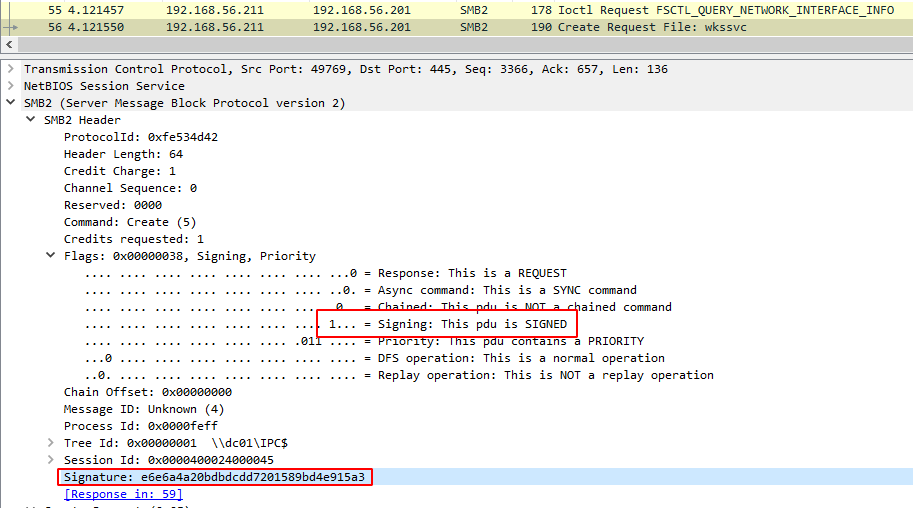
Once this authentication is completed, the session continues, and the SMB exchanges are effectively signed.
LDAP
Signing matrix
For LDAP, there are also three levels:
- Disabled: This means that packet signing is not supported.
- Negotiated Signing: This option indicates that the machine can handle signing, and if the machine it is communicating with also handles it, then they will be signed.
- Required: This finally indicates that signing is not only supported, but that packets must be signed in order for the session to continue.
As you can read, the intermediate level, Negotiated Signing differs from the SMBv2 case, because this time, if the client and the server are able to sign packets, then they will. Whereas for SMBv2, packets were only signed if it was a requirement for at least one entity.
So for LDAP we have a matrix similar to SMBv1, except for the default behaviors.
The difference with SMB is that in Active Directory domain, all hosts have Negotiated Signing setting. The domain controller doesn’t require signing.
Settings
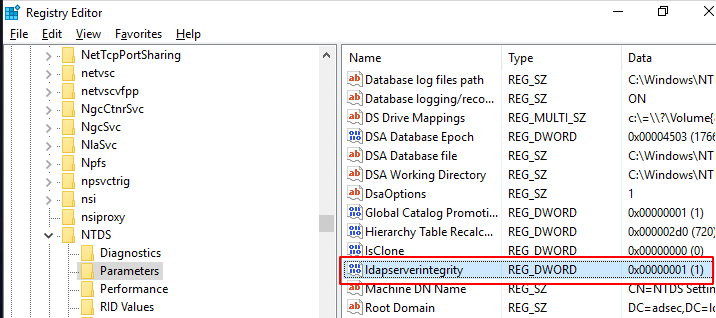
For the domain controller, the ldapserverintegrity registry key is in HKEY_LOCAL_MACHINE\System\CurrentControlSet\Services\NTDS\Parameters hive and can be 0, 1 or 2 depending on the level. It is set to 1 on the domain controller by default.
For the clients, this registry key is located in HKEY_LOCAL_MACHINE\System\CurrentControlSet\Services\ldap
It is also set to 1 for clients. Since all clients and domain controllers have Negotiated Signing, all LDAP packets are signed by default.
Setup
Unlike SMB, there is no flag in LDAP that indicates whether packets will be signed or not. Instead, LDAP uses flags set in NTLM negotiation. There is no need for more information. In the case where both client and server support LDAP signing, then the NEGOTIATE_SIGN flag will be set and the packets will be signed.
If one party requires signing, and the other party does not support it, then the session simply won’t start. The party requiring signing will ignore the unsigned packets.
So now we then understand that, contrary to SMB, if we are between a client and a server and we want to relay an authentication to the server using LDAP, we need two things :
- The server must not require packet signing, which is the case for all machines by default
- The client must not set the
NEGOTIATE_SIGNflag to 1. If he does, then the signature will be expected by the server, and since we don’t know the client’s secret, we won’t be able to sign our crafted LDAP packets.
Regarding requirement 2, sometimes clients don’t set this flag, but unfortunately, the Windows SMB client sets it! By default, it is not possible to relay SMB authentication to LDAP.
So why not just change the NEGOTIATE_FLAG flag and set it to 0? Well… NTLM messages are also signed. This is what we will see in the next paragraph.
Authentication signing (MIC)
We saw how a session could be protected against a middle man attacker. Now, to understand the interest of this chapter, let’s look at a specific case.
Edge case
Let’s imagine that an attacker manages to put himself in man-in-the-middle position between a client and a domain controller, and that he receives an authentication request via SMB. Knowing that a domain controller requires SMB signing, it is not possible for the attacker to relay this authentication via SMB. On the other hand, it is possible to change protocol, as we have seen above, and the attacker decides to relay to the LDAPS protocol, as authentication and session should be independant.
Well, they are almost independent.
Almost, because we saw that in the authentication data, there was the NEGOTIATE_SIGN flag which was only present to indicate whether the client and server supported signing. But in some cases, this flag is taken into account, as we saw with LDAP.
Well for LDAPS, this flag is also taken into account by the server. If a server receives an authentication request with the NEGOTIATE_SIGN flag set to 1, it will reject the authentication. This is because LDAPS is LDAP over TLS, and it is TLS layer that handles packet signing (and encryption). Thus, an LDAPS client has no reason to indicate that it can sign its packets, and if it claims to be able to do so, the server laughs at it and slams the door.
Now in our attack, the client we’re relaying wanted to authenticate via SMB, so yes, it supports packet signing, and yes, it sets the NEGOTIATE_SIGN flag to 1. But if we relay its authentication, without changing anything, via LDAPS, then the LDAPS server will see this flag, and will terminate the authentication phase, no question asked.
We could simply modify the NTLM message and remove the flag, couldn’t we? If we could, we would, it would work well. Except that there is also a signature at NTLM level.
That signature, it’s called the MIC, or Message Integrity Code.
MIC - Message Integrity Code
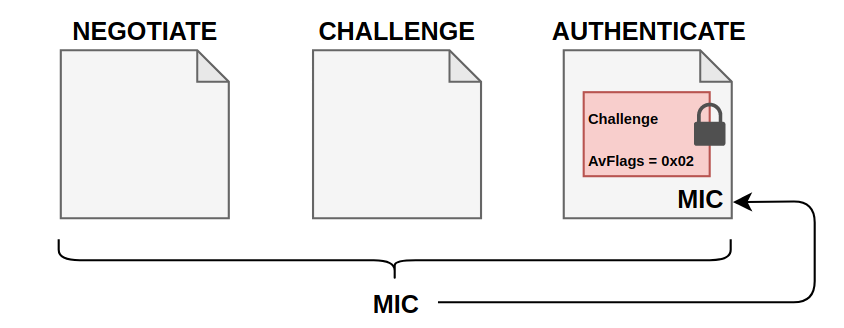
The MIC is a signature that is sent only in the last message of an NTLM authentication, the AUTHENTICATE message. It takes into account the 3 messages. The MIC is computed with HMAC_MD5 function, using as a key that depends on the client’s secret, called the session key.
HMAC_MD5(Session key, NEGOTIATE_MESSAGE + CHALLENGE_MESSAGE + AUTHENTICATE_MESSAGE)
What is important is that the session key depends on the client’s secret, so an attacker can’t re-compute the MIC.
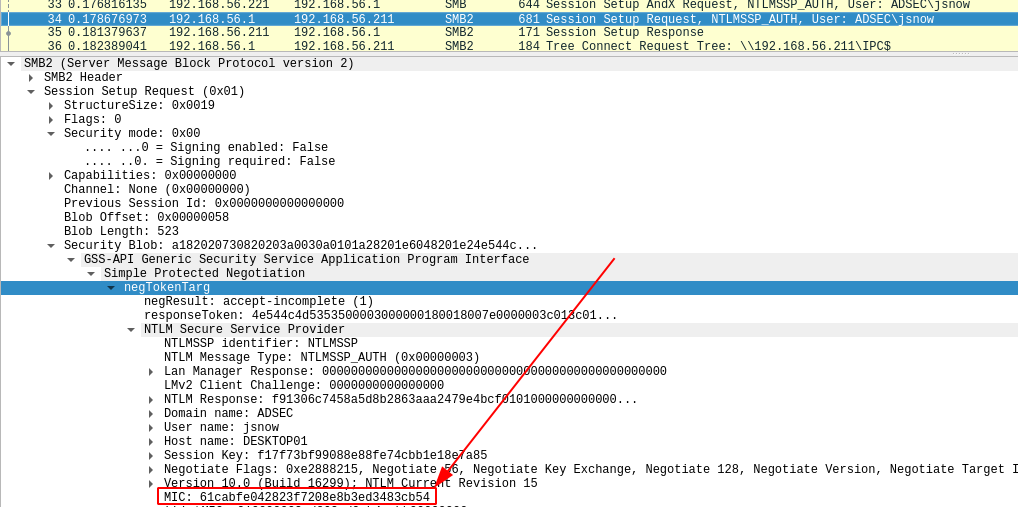
Here’s an example of MIC:
Therefore, if only one of the 3 messages has been modified, the MIC will no longer be valid, since the concatenation of the 3 messages will not be the same. So you can’t change the NEGOTIATE_SIGN flag, as suggested in our example.
What if we just remove the MIC? Because yes, the MIC is optional.
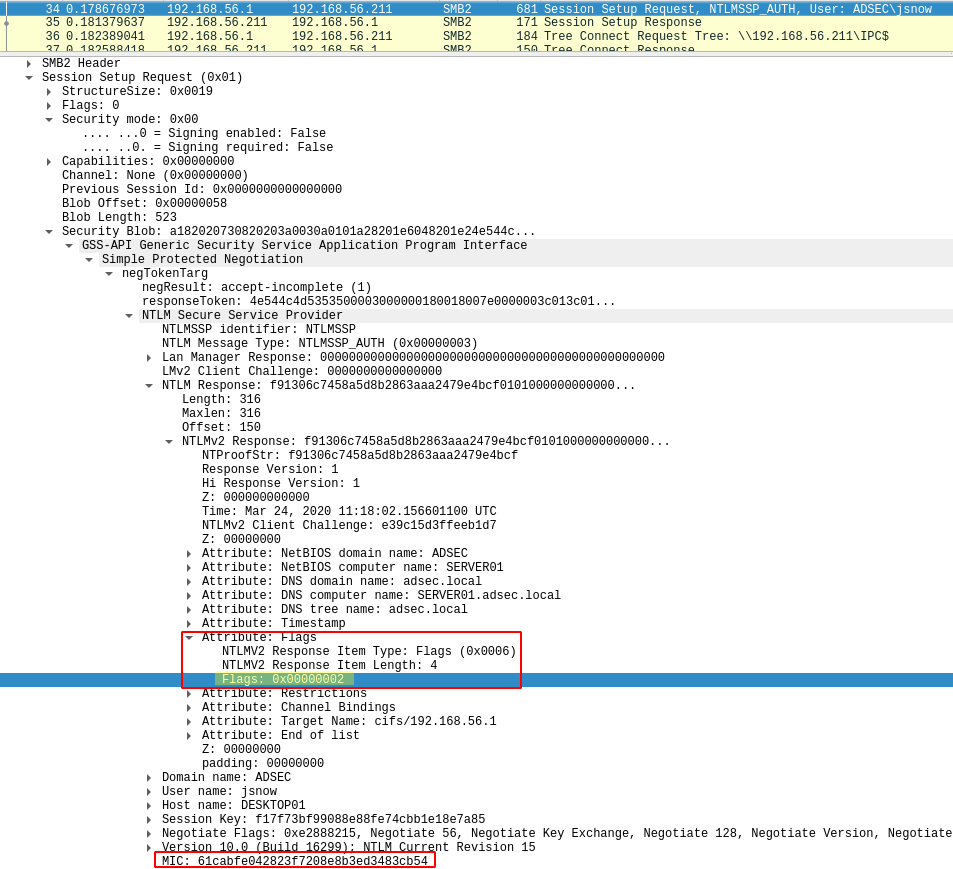
Well it won’t work, because there is another flag that indicates that a MIC will be present, msAvFlags. It is also present in NTLM response and if it is 0x00000002, it tells the server that a MIC must be present. So if the server doesn’t see the MIC, it will know that there is something going on, and it will terminate the authentication. If the flag says there must be a MIC, then there must be a MIC.
All right, and if we set that msAcFlags to 0, and we remove the MIC, what happens? Since there’s no more MICs, we can’t verify that the message has been changed, can we?
…
Well, we can. It turns out that the NTLMv2 Hash, which is the response to the challenge sent by the server, is a hash that takes into account not only the challenge (obviously), but also all the flags of the response. As you may have guessed, the flag indicating the MIC presence is part of this response.
Changing or removing this flag would make the NTLMv2 hash invalid, since the data will have been modified. Here what it looks like.
The MIC protects the integrity of the 3 messages, the msAvFlags protects the presence of the MIC, and the NTLMv2 hash protects the presence of the flag. The attacker, not being aware of the user’s secret, cannot re-compute this hash.
So you will have understood that, we can do nothing in this case, and that’s because of the MIC.
Drop the MIC
A little review of a recent vulnerability found by Preempt that you will easily understand now.
It’s CVE-2019-1040 nicely named Drop the MIC. This vulnerability showed that if the MIC was just removed, even if the flag indicated its presence, the server accepted the authentication without flinching. This was obviously a bug that has since been fixed.
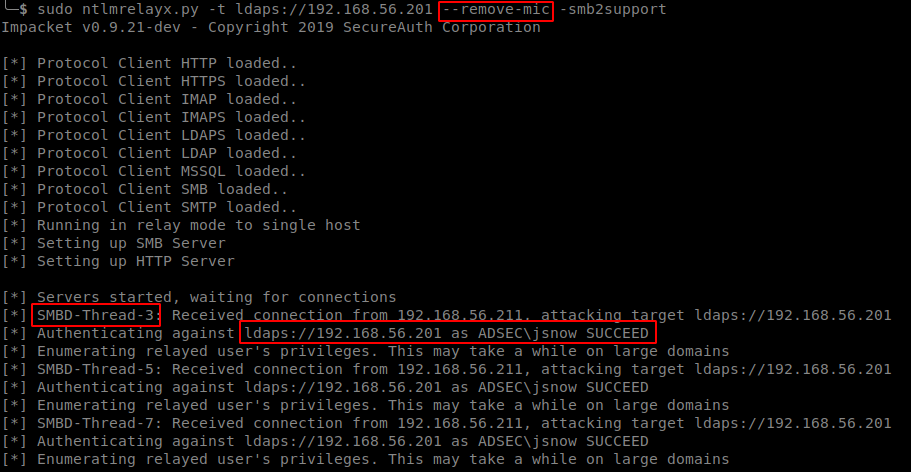
It has been integrated in ntlmrelayx tool via the use of the --remove-mic parameter.
Let’s take our earlier example, but this time with a domain controller that is still vulnerable. This is what it looks like in practice.
Our attack is working. Amazing.
For information, another vulnerability was discovered by the very same team, and they called it Drop The MIC 2.
Session key
Earlier we were talking about session and authentication signing, saying that to sign something you have to know the user’s secret. We said in the chapter about MIC that in reality it’s not exactly the user’s secret that is used, but a key called session key, which depends on the user’s secret.
To give you an idea, here’s how the session key is computed for NTLMv1 and NTLMv2.
# For NTLMv1
Key = MD4(NT Hash)

# For NTLMv2
NTLMv2 Hash = HMAC_MD5(NT Hash, Uppercase(Username) + UserDomain)
Key = HMAC_MD5(NTLMv2 Hash, HMAC_MD5(NTLMv2 Hash, NTLMv2 Response + Challenge))
Going into the explanations would not be very useful, but there is clearly a complexity difference from one version to the other. I repeat, do not use NTLMv1 in a production network.
With this information, we understand that the client can compute this key on his side, since he has all the information in hand to do so.
The server, on the other hand, can’t always do it alone, like a big boy. For local authentication, there is no problem since the server knows the user’s NT hash.
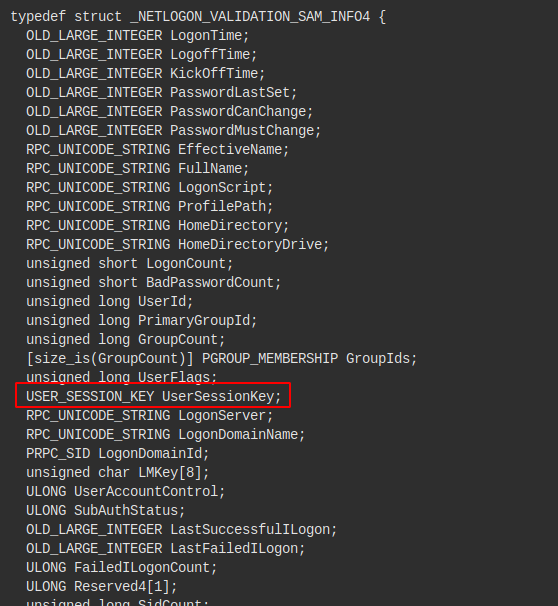
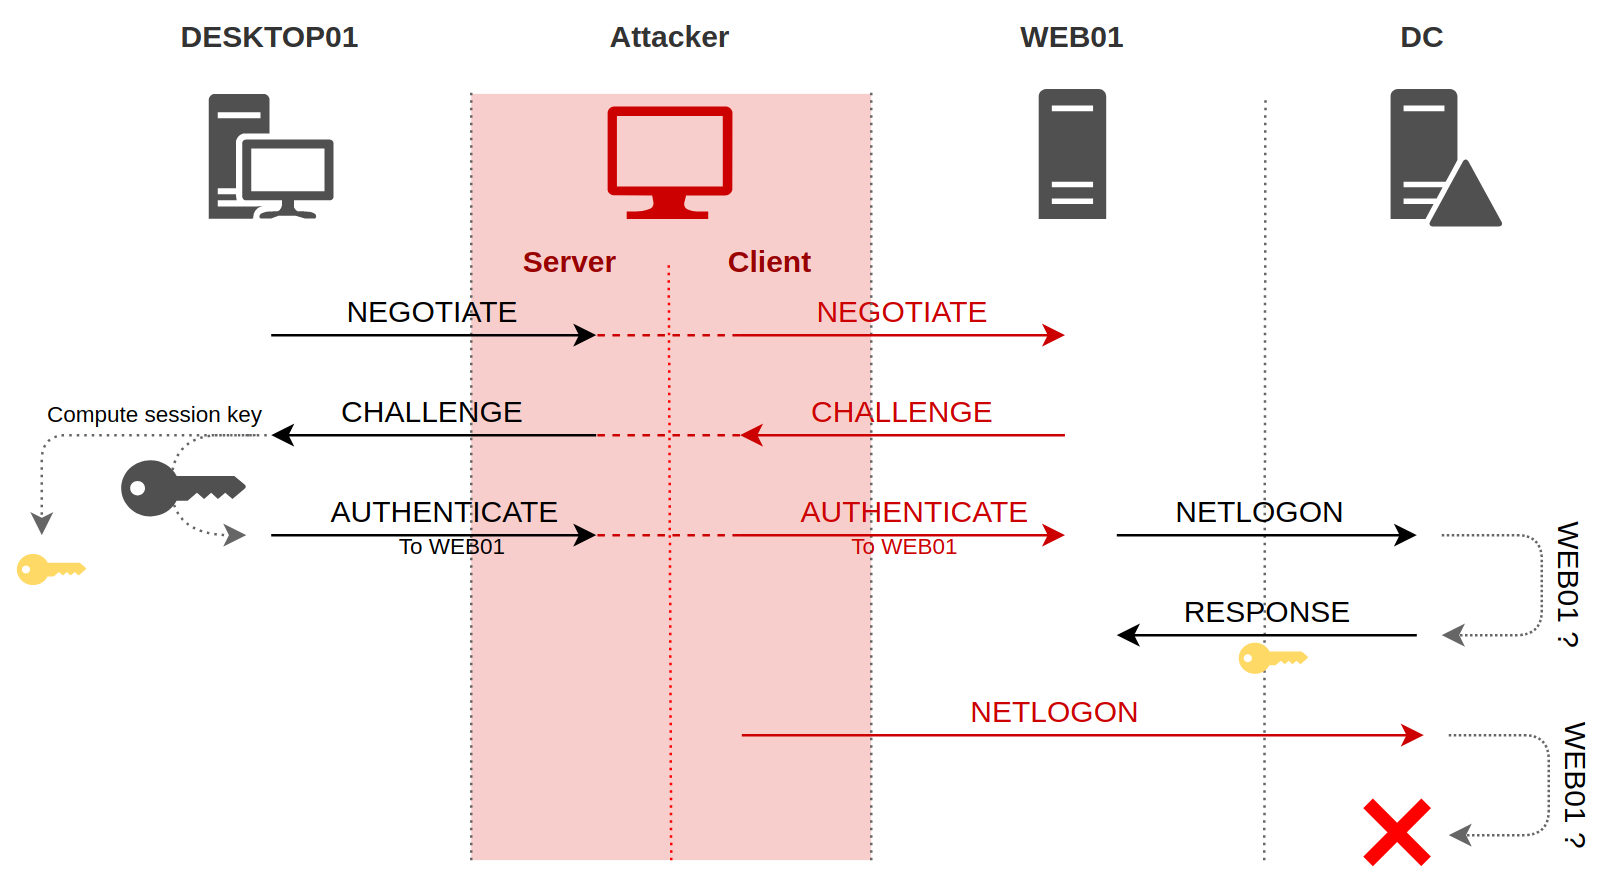
On the other hand, for authentication with a domain account, the server will have to ask the domain controller to compute the session key for him, and send it back. We saw in pass-the-hash article that the server sends a request to the domain controller in a NETLOGON_NETWORK_INFO structure and the domain controller responds with a NETLOGON_VALIDATION_SAM_INFO4 structure. It is in this response from the domain controller that the session key is sent, if authentication is successful.
The question then arises as to what prevents an attacker from making the same request to the domain controller as the target server. Well before CVE-2015-0005, nothing!
What we found while implementing the NETLOGON protocol [12] is the domain controller not verifying whether the authentication information being sent, was actually meant to the domain-joined machine that is requesting this operation (e.g. NetrLogonSamLogonWithFlags()). What this means is that any domain-joined machine can verify any pass-through authentication against the domain controller, and to get the base key for cryptographic operations for any session within the domain.
So obviously, Microsoft has fixed this bug. To verify that only the server the user is authenticating to has the right to ask for the session key, the domain controller will verify that the target machine in the AUTHENTICATE response is the same as the host making the NetLogon request.
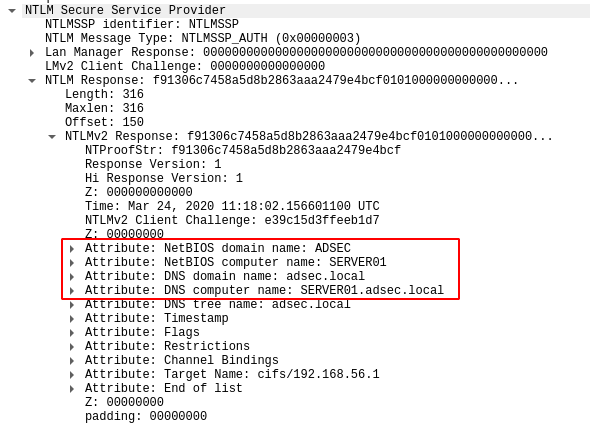
In the AUTHENTICATE response, we detailed the presence of msAvFlags indicating whether or not the MIC is present, but there is also other information, such as the Netbios name of the target machine.
This is the name that is compared with the host making the NetLogon request. Thus, if the attacker tries to make a NetLogon request for the session key, since the attacker’s name does not match the targeted host name in NTLM response, the domain controller will reject the request.
Finally, in the same way as msAvFlags, we cannot change the machine name on the fly in the NTLM response, because it is taken into account in the calculation of the NTLMv2 response.
A vulnerability similar to Drop the MIC 2 has been discovered recently by Preempt security team.
Channel Binding
We’re going to talk about one last notion. Several times we have repeated that the authentication layer, thus NTLM messages, was almost independent of the application layer, the protocol in use (SMB, LDAP, …). I say “almost” because we have seen that some protocols use some NTLM messages flags to know if the session must be signed or not.
In any case, as it stands, it is quite possible for an attacker to retrieve an NTLM message from protocol A, and send it back using protocol B. This is called cross-protocol relay as we already mentioned.
Well, a new protection exists to counter this attack. It’s called channel binding, or EPA (Enhanced Protection for Authentication). The principle of this protection is to bind the authentication layer with the protocol in use, even with the TLS layer when it exists (LDAPS or HTTPS for example). The general idea being that in the last NTLM AUTHENTICATE message, a piece of information is put there and cannot be modified by an attacker. This information indicates the desired service, and potentially another information that contains the target server’s certificate’s hash.
We’ll look at these two principles in a little more detail, but don’t you worry, it’s relatively simple to understand.
Service binding
This first protection is quite simple to understand. If a client wishes to authenticate to a server to use a specific service, the information identifying the service will be added in the NTLM response.
This way, when the legitimate server receives this authentication, it can see the service that was requested by the client, and if it differs from what is actually requested, it will not agree to provide the service.
Since the service name is in the NTLM response, it is protected by the NtProofStr response, which is an HMAC_MD5 of this information, the challenge, and other information such as msAvFlags. It is computed with the client’s secret.
In the example shown in the last diagram, we see a client trying to authenticate itself via HTTP to the server. Except that the server is an attacker, and the attacker replays this authentication to a legitimate server, to access a network share (SMB).
Except that the client has indicated the service he wants to use in his NTLM response, and since the attacker cannot modify it, he has to relay it as is. The server then receives the last message, compares the service requested by the attacker (SMB) with the service specified in the NTLM message (HTTP), and refuses the connection, finding that the two services do not match.
Concretely, what is called service is in fact the SPN or Service Principal Name. I dedicated a whole article to the explanation of this notion.
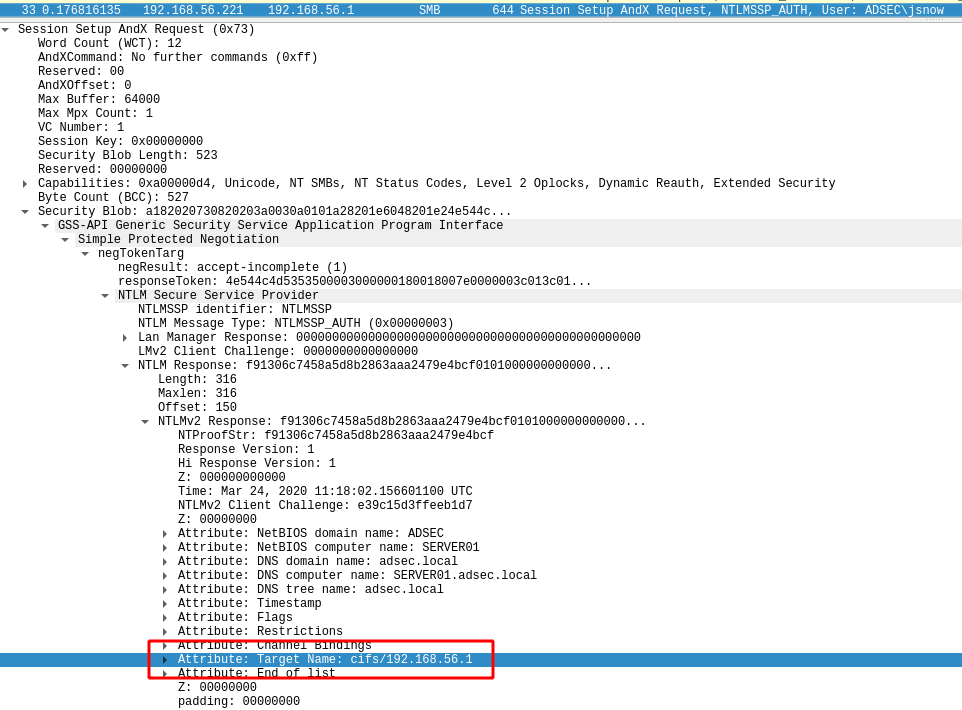
Here is a screenshot of a client sending SPN in its NTLM response.
We can see that it indicates to use the CIFS service (equivalent to SMB, just a different terminology). Relaying this to an LDAP server that takes this information into account will result in a nice Access denied from the server.
But as you can see, not only there is the service name (CIFS) but there is also the target name, or IP address. It means that if an attacker relays this message to a server, the server will also check the target part, and will refuse the connexion because the IP address found in the SPN does not match his IP address.
So if this protection is supported by all clients and all servers, and is required by every server, it mitigaes all relay attempts.
TLS Binding
This time, the purpose of this protection is to link the authentication layer, i.e. NTLM messages, to the TLS layer that can potentially be used.
If the client wants to use a protocol encapsulated in TLS (HTTPS, LDAPS for example), it will establish a TLS session with the server, and it will compute the server certificate hash. This hash is called the Channel Binding Token, or CBT. Once computed, the client will put this hash in its NTLM response. The legitimate server will then receive the NTLM message at the end of the authentication, read the provided hash, and compare it with the real hash of its certificate. If it is different, it means he wasn’t the original recipient of the NTLM exchange.
Again, since this hash is in the NTLM response, it is protected by the NtProofStr response, like the SPN for Service Binding.
Thanks to this protection, the following two attacks are no longer possible :
- If an attacker wishes to relay information from a client using a protocol without a TLS layer to a protocol with a TLS layer (HTTP to LDAPS, for example), the attacker will not be able to add the certificate hash from the target server into the NTLM response, since it cannot update the NtProofStr.
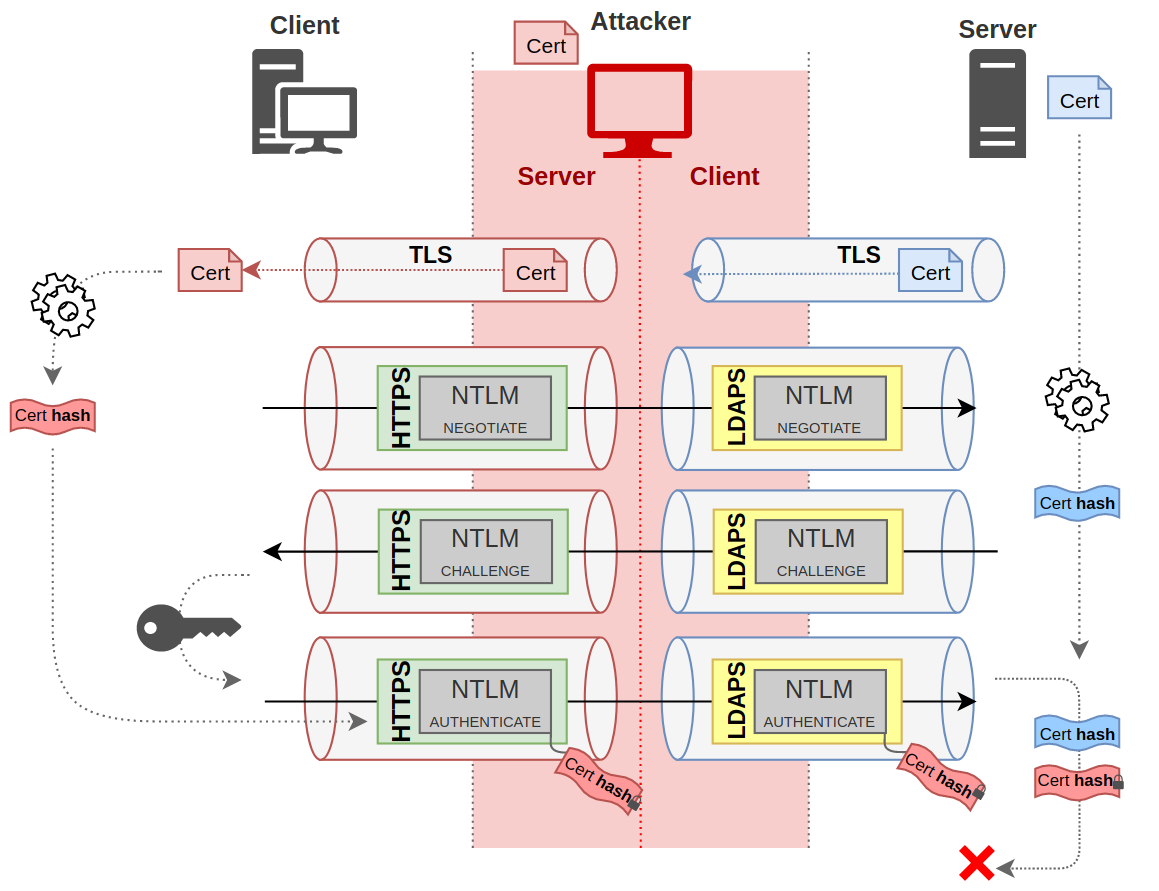
- If an attacker wishes to relay a protocol with TLS to another protocol with TLS (HTTPS to LDAPS), when establishing the TLS session between the client and the attacker, the attacker will not be able to provide the server certificate, since it does not match the attacker’s identity. It will therefore have to provide a “homemade” certificate, identifying the attacker. The client will then hash this certificate, and when the attacker relays the NTLM response to the legitimate server, the hash in the response will not be the same as the hash of the real certificate, so the server will reject the authentication.
Here is a diagram to illustrate the 2nd case. Seems complicated, but it’s not.
It shows the establishment of two TLS sessions. One between the client and the attacker (in red) and one between the attacker and the server (in blue). The client will retrieve the attacker’s certificate, and calculate a hash, cert hash, in red.
At the end of the NTLM exchanges, this hash will be added in the NTLM response, and will be protected since it is part of the encrypted data of the NTLM response. When the server receives this hash, it will hash his own certificate, and seeing that it is not the same result, it will refuse the connection.
What can be relayed?
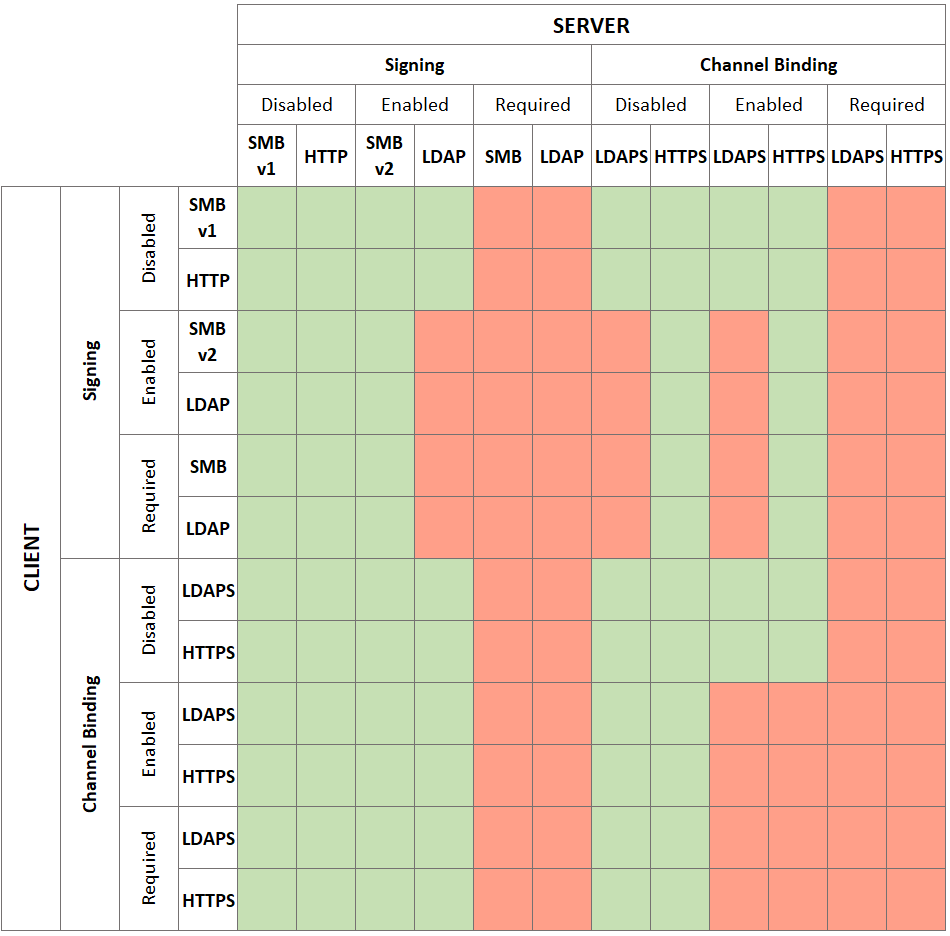
With all this information, you should be able to know which protocols can be relayed to which protocols. We have seen that it is impossible to relay from SMB to LDAP or LDAPS, for example. On the other hand, any client that does not set the NEGOTIATE_SIGN flag can be relayed to LDAP if the signature is not required, or LDAPS is channel binding is not required.
As there are many cases, here is a table summarizing some of them.
I think we can’t relay LDAPS or HTTPS since the attacker doesn’t have a valid certificate but let’s say the client is permissive and allowed untrusted certificates. Other protocols could be added, such as SQL or SMTP, but I must admit I didn’t read the documentation for all the protocols that exist. Shame on me.
Stop. Using. NTLMv1.
Here is a little “fun fact” that Marina Simakov suggested me to add. As we discussed, NTLMv2 hash takes into account the server’s challenge, but also the msAvFlags flag which indicates the presence of a MIC field, the field indicating the NetBios name of the target host during authentication, the SPN in case of service binding, and the certificate hash in case of TLS binding.
Well NTLMv1 protocol doesn’t do that. It only takes into account the server’s challenge. In fact, there is no longer any additional information such as the target name, the msAvFlags, the SPN or the CBT.
So, if an NTLMv1 authentication is allowed by a server, an attacker can simply remove the MIC and thus relay authentications to LDAP or LDAPS, for example.
But more importantly, he can make NetLogon requests to retrieve the session key. Indeed, the domain controller has no way to check if he has the right to do so. And since it won’t block a production network that isn’t completely up to date, it will kindly give it to the attacker, for “retro-compatibility reasons”.
Once he has the session key, he can sign any packet that he wants. It means that even if the target requests signing, he will be able to do so.
This is by design and it can not be fixed. So I repeat, do not allow NTLMv1 in a production network.
Conclusion
Well, that’s a lot of information.
We have seen here the details of NTLM relay, being aware that authentication and session that follows are two distinct notions allowing to do cross-protocol relay in many cases. Although the protocol somehow includes authentication data, it is opaque to the protocol and managed by SSPI.
We have also shown how packet signing can protect the server from man-in-the-middle attacks. To do this, the target must wait for signed packet coming from the client, otherwise the attacker will be able to pretend to be someone else without having to sign the messages he sends.
We saw that MIC was very important to protect NTLM exchanges, especially the flag indicating whether packets will be signed for certain protocols, or information about channel binding.
We ended by showing how channel binding can link the authentication layer and the session layer, either via the service name or via a link with the server certificate.
I hope this long article has given you a better understanding of what happens during an NTLM relay attack and the protections that exist.
Since this article is quite substantial, it is quite likely that some mistakes have slipped in. Feel free to contact me on twitter or on my Discord Server to discuss this.


